
Dublin Listing - Create a New Project - Issuers
When creating a listing project for Dublin, you will be asked to fill-in the following information:
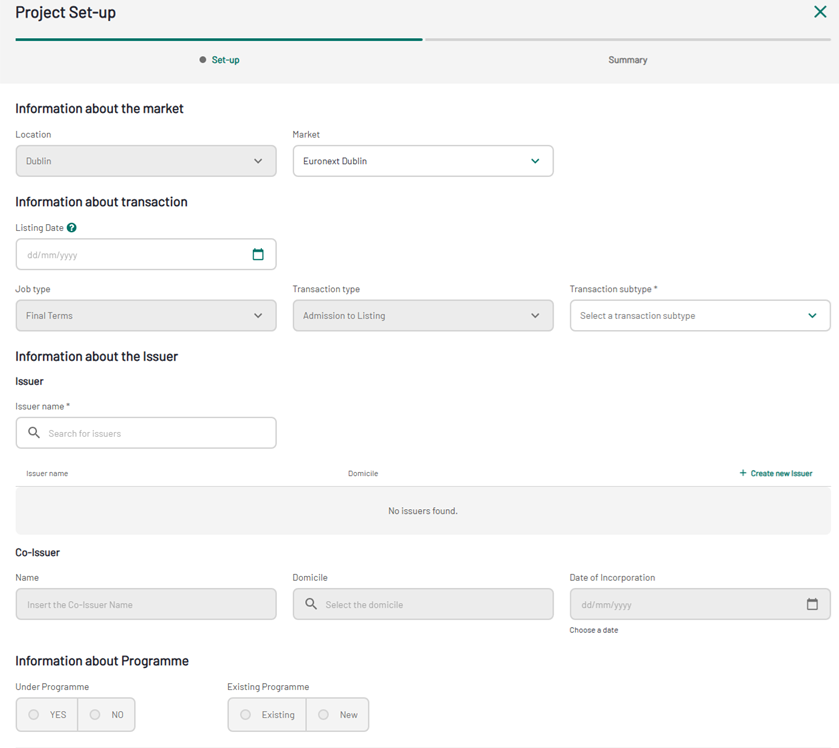
1. Project se-up
First select the market on which you want to list your instrument. You will be able to choose "Euronext Dublin" or "Euronext Global Exchange Market" (GEM).
Then supply the information about the transaction, where you must select a "Transaction subtype".
For of a Final Terms job type you can define if your project is:
- Final Terms
- Final Terms (Tap Issue)
- Final Terms (Subsequent Series)
To define the Issuer, type the Issuer name in the dedicated field to select from a dropdown list.
In Account Information section, if you select "Wire Transfer" as a Payment method, "Bulk Account" field will be greyed, and additional fields will be displayed and must be completed.
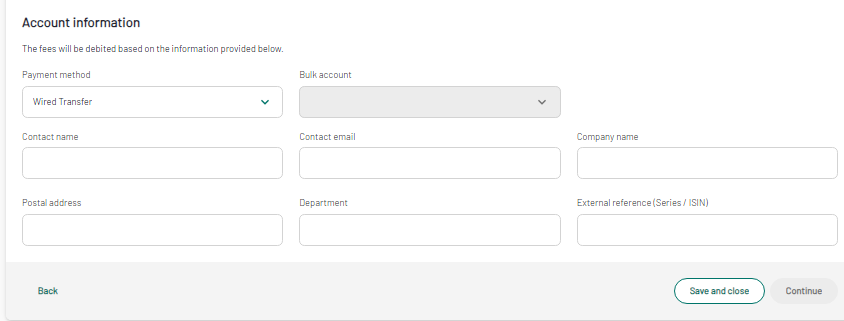
2. Project set-up - Account information details
While selecting "Bulk Account" as a Payment Method, the new field "Multi final terms" will pop-up, allowing to define if you will upload one single document (Multi Docs = No), or if you are going to upload multiple final terms (Multi Docs = Yes).
Project folder
The Project folder is the dashboard of the listing application. From here, you can access the Instrument Information form and Issuer Document section. You can monitor the progress of your project up to the availability of the related market notice by checking the completion percentage.
- Listing Application: where you provide the relevant information and documents, subject to Euronext approval.
- Listing Finalization: where you can see the output of you listing, and view the related market notice.
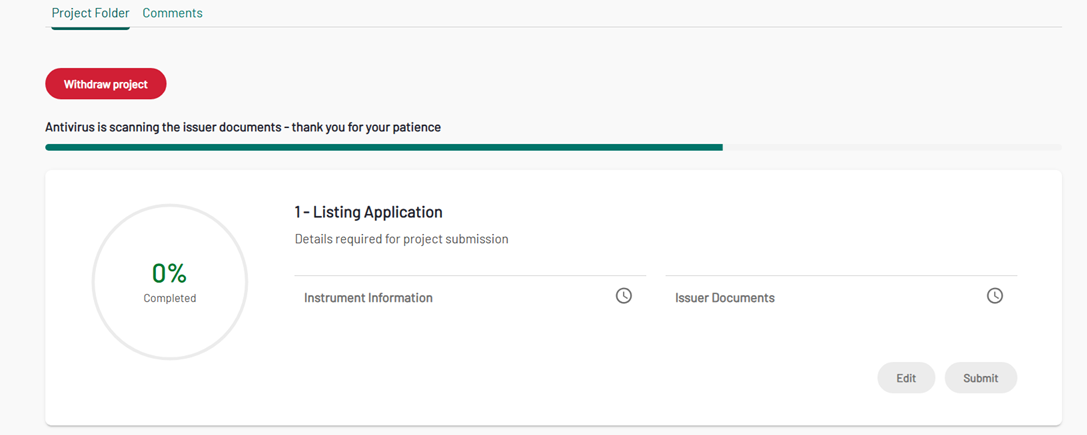
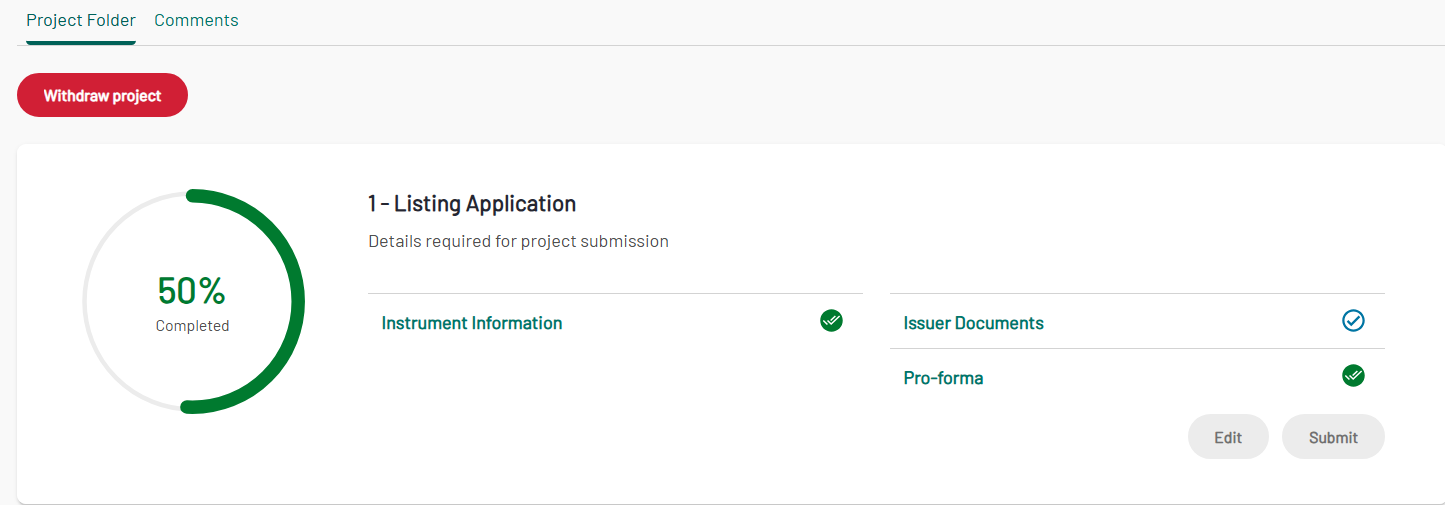
Listing Application Phase
This is what a project folder looks like when it has just been created, and the selected payment method is "Bulk account". Listing Application progress percentage is 0%, and project status is "Ongoing".
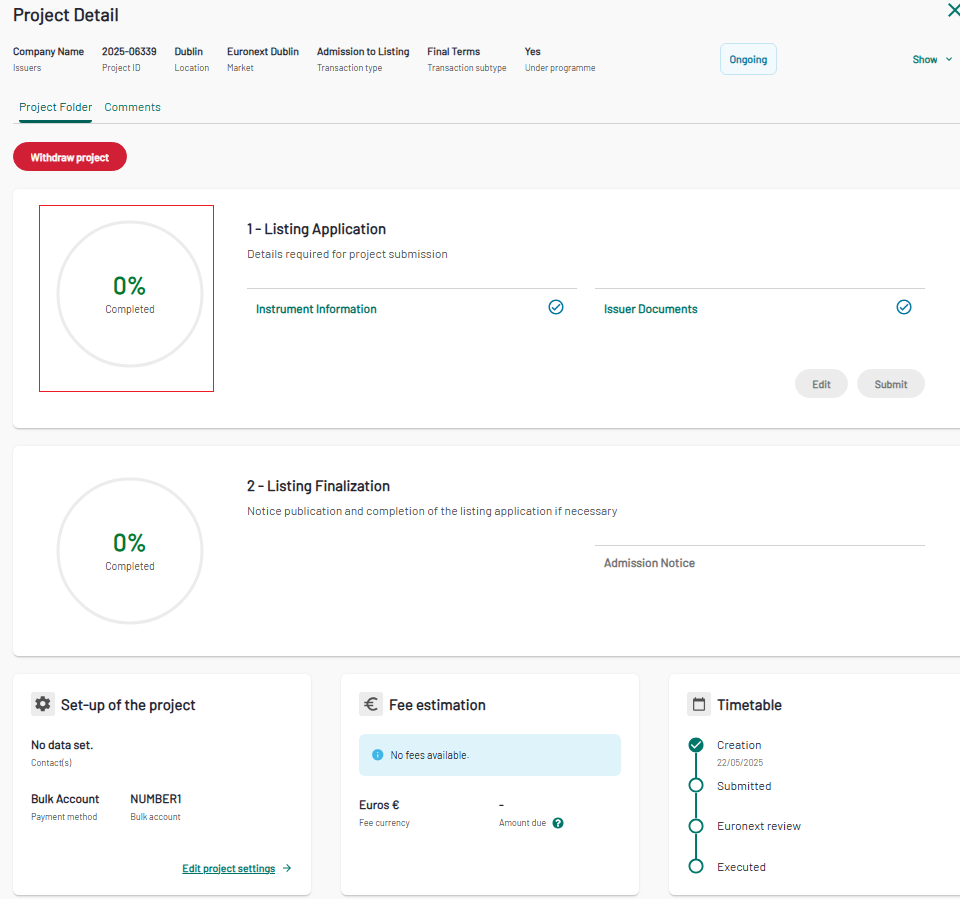
3. Project Folder - Project with Bulk Account
Percentage increase when payment method is Bulk Account
- When the Issuer Document is completed (by clicking on "Confirm"), the progress percentage of the Listing Application phase will increase to 45%;
- When the Instrument Information is completed (by clicking on "Confirm"), the progress percentage of the Listing Application phase will increase to 45%;
- When clicking on Submit, the progress percentage of the Listing Application phase will reach 100% completion.
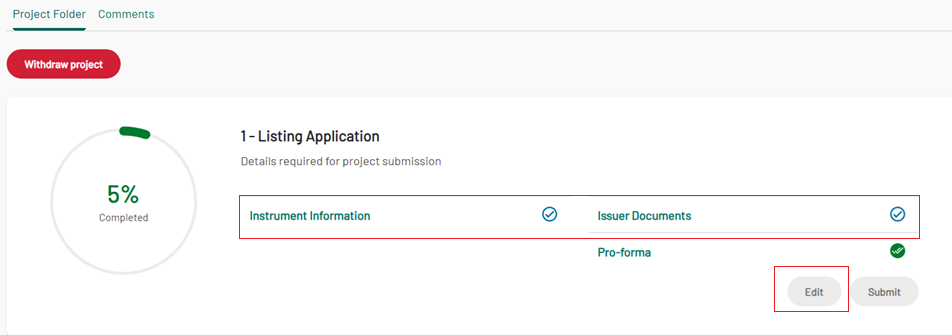
When a project is created with payment method "Wire Transfer" and the Final Terms is uploaded from the project set-up, this is what a project folder looks like when it has just been created.
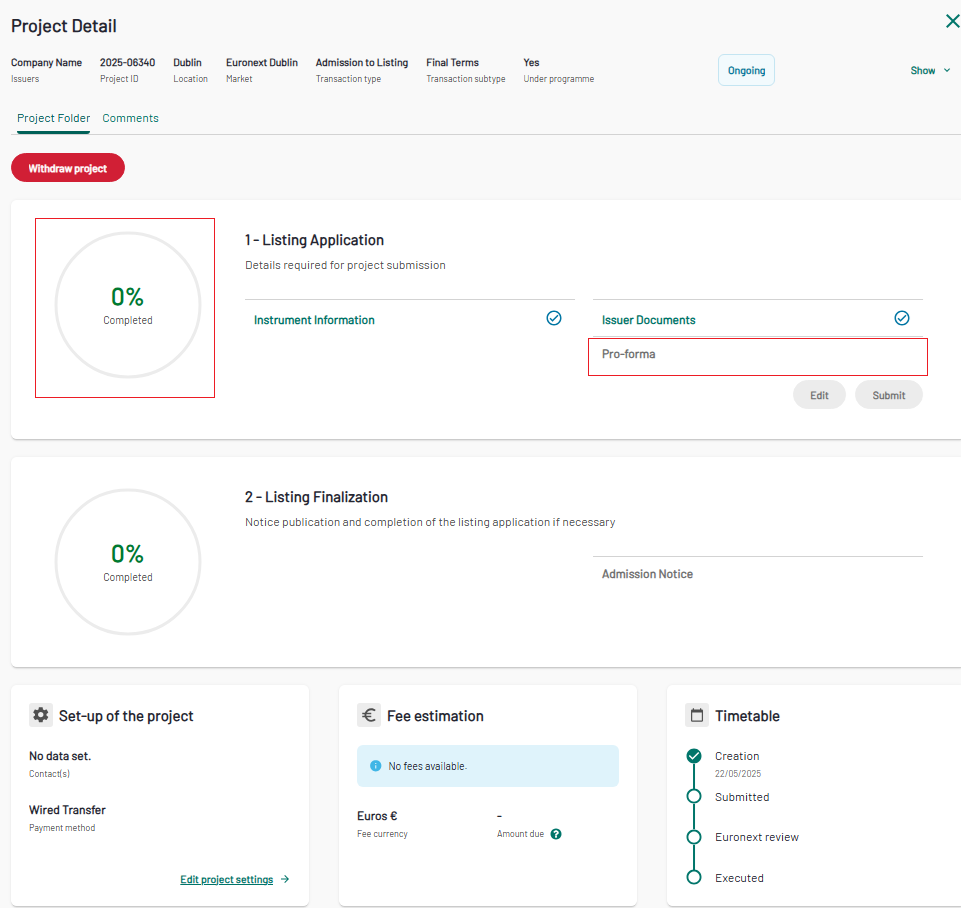
4. Project Folder - Project with Wire Transfer
Percentage increase when payment method is Wired Transfer
- When the Pro-forma is generated and available for review and download, the progress percentage of the Listing Application phase will increase to 5%;
- When the Issuer Document is completed (by clicking on "Confirm"), the progress percentage of the Listing Application phase will increase to 45%;
- When clicking on Submit, the progress percentage of the Listing Application phase will reach 100% completion.
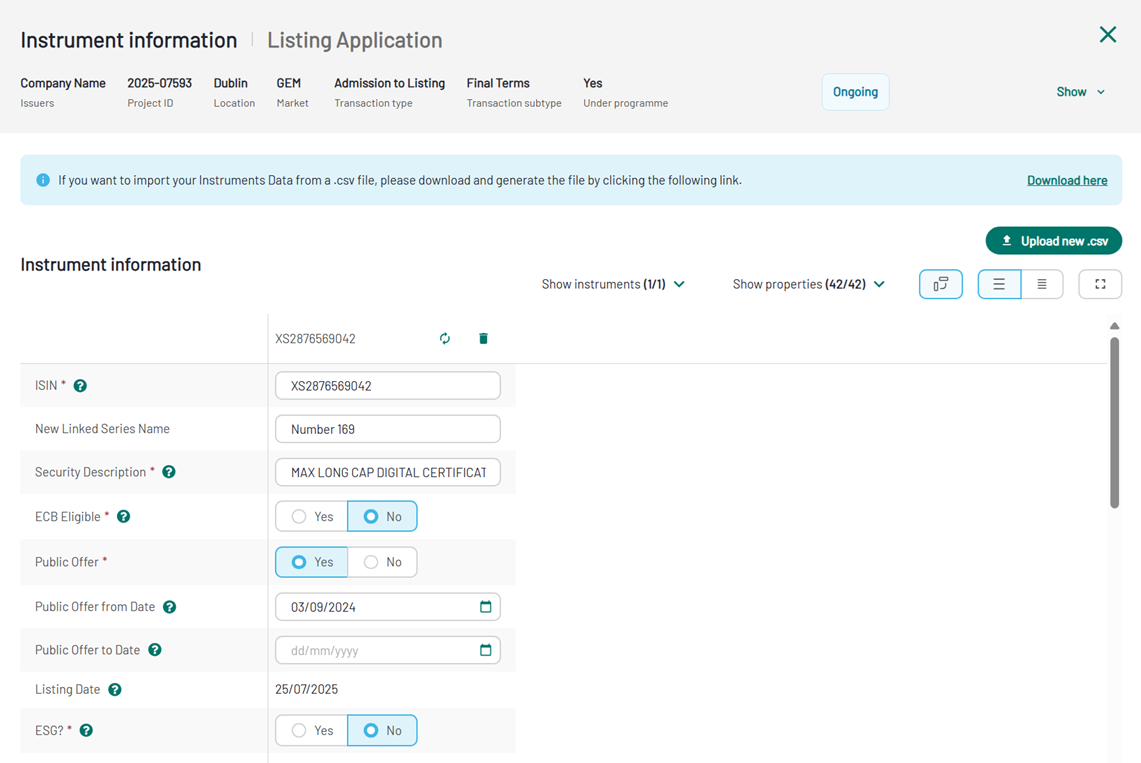
Instrument Information
Click the “Instrument Information” link in the project folder to enter the general information about the listing.
Instrument Information can be completed in different ways:
- using the AI Extractor
- uploading a .csv format file to facilitate the process of entering data on the platform
- manually filled in directly from the form
Complete the Instrument Information using the AI Extractor
Click the “Instrument Information” link in the project folder to enter the general information about the listing. On the top right corner "Fill with AI" button is available, click on it to be redirected to the Issuer Document section.
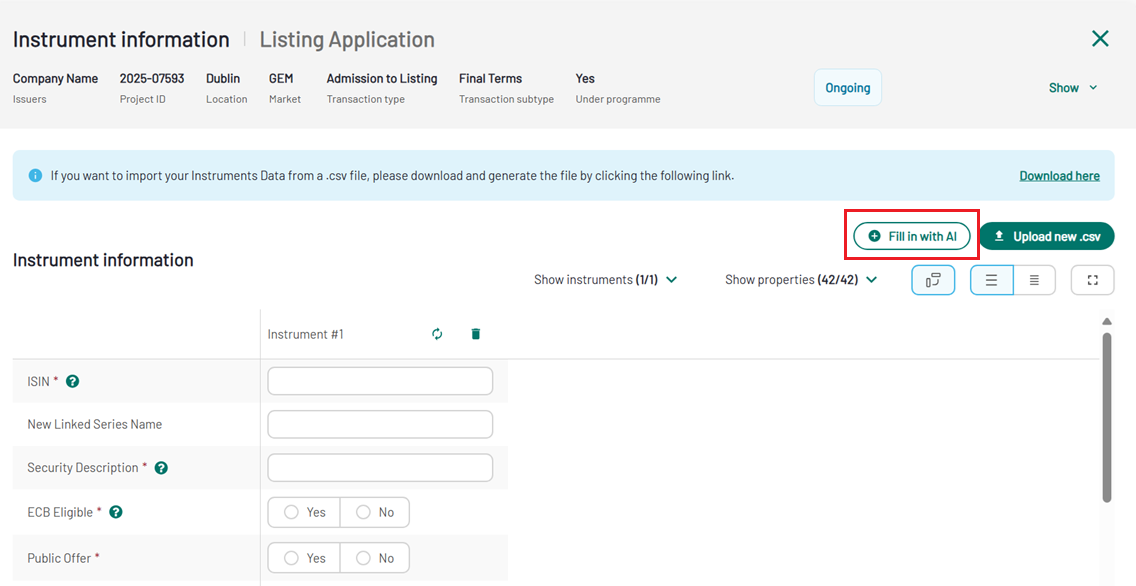
5. Instrument Information - Fill in with AI
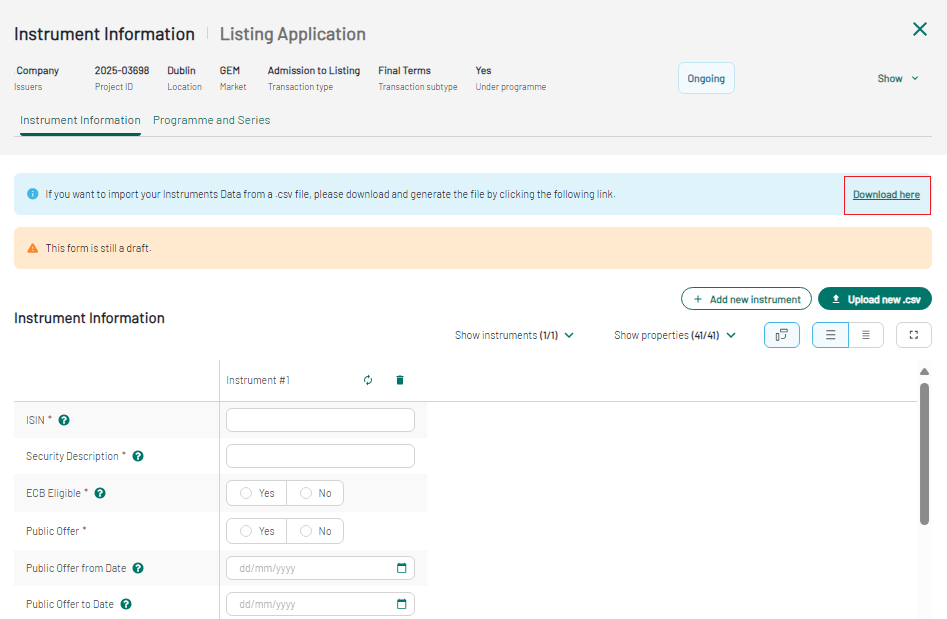
Complete the Instrument Information uploading the csv file
To download the .csv generator, click in the "Instrument Information" link in the Project Folder, and then on "Download here" in the light blue banner, as shown in the screenshot below:
6. Instrument information - Download option
You will need to enable the embedded Macro to allow the csv generation. To do so, right-click on the file and select "Properties", and in "General " tab, tick "Unblock".
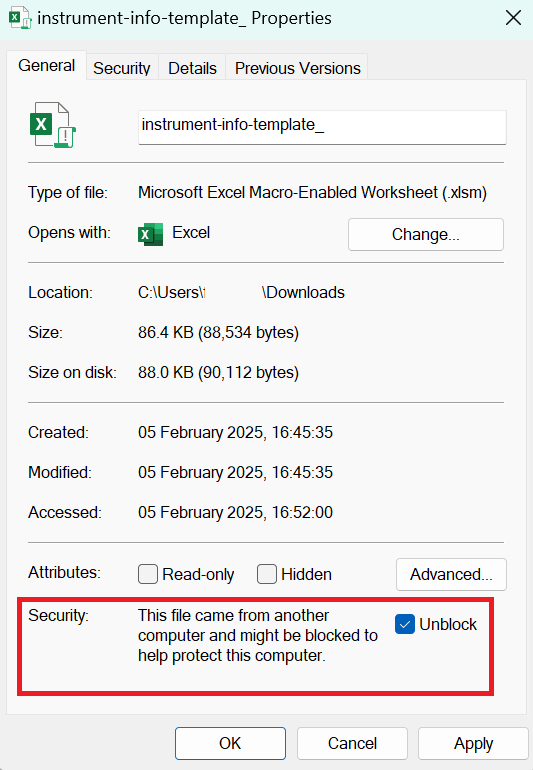
7. Instrument information - Unblock option
Open the downloaded file and start filling it in. You can type the values manually or use the dropdown list of values, when available. Once the file is completed, click on "Generate CSV" to save this version of the file, ready to be uploaded on the application.
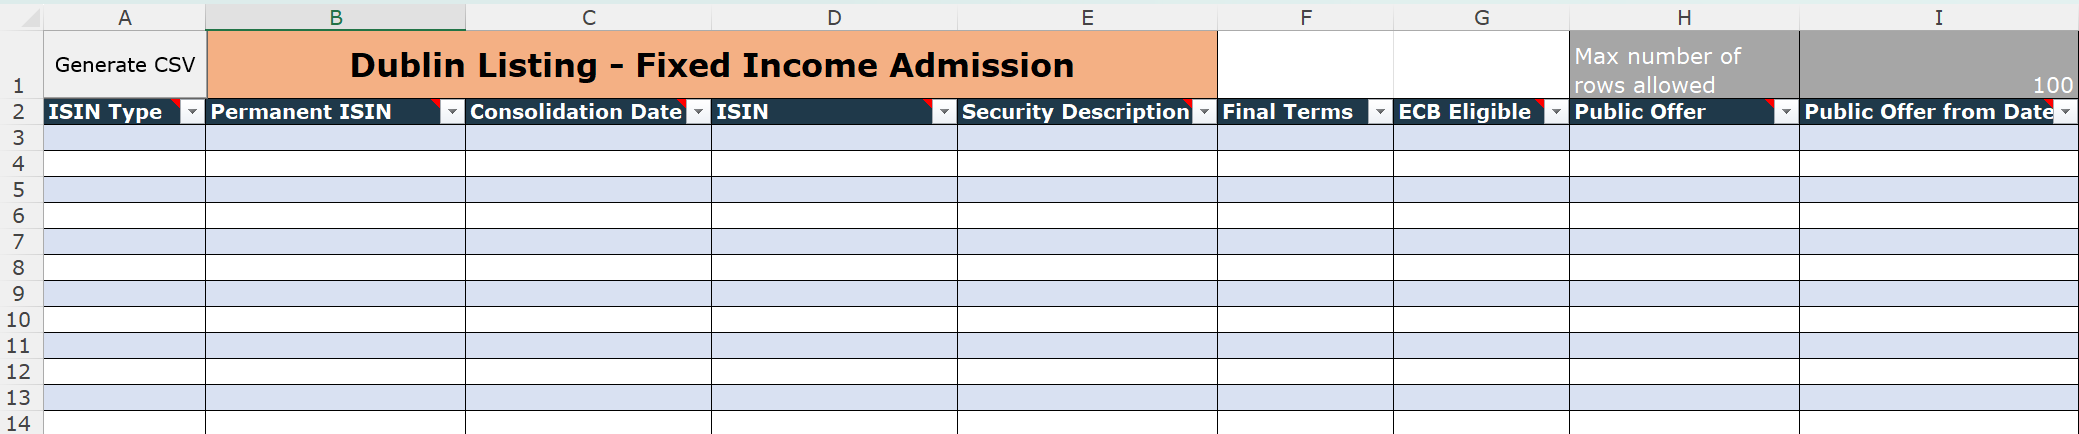
8. Instrument information - csv generator
To upload the generated.csv file, click on the "Upload new.csv" button. A box will open allowing you to brows the fille to upload, or drag and drop it into the box.

9. Instrument information - Upload .csv option
Upon upload, the data is then automatically converted to a table. If there are any errors in the data, these will be highlighted in red upon upload. You can correct them directly in the form.
Fill-in the Instrument Information manually
To fill-in the form manually, you can start typing field by field. To add new column, click on the "Add new Instrument" button. The column headers will be labelled will be added. The column header will be named as "Instrument#1". A single Final Terms project should only include ‘Instrument#1’ and multi-Final terms project can include multiple instruments. To permanently delete an Instrument, click on the dustbin.
Once all the data is correct, you can save your draft by clicking on "Save and close" button or click or submit the form to Euronext, by clicking on "Validate" button. If there are any errors in the data, they will be highlighted in red once the "Validate" button has been clicked.
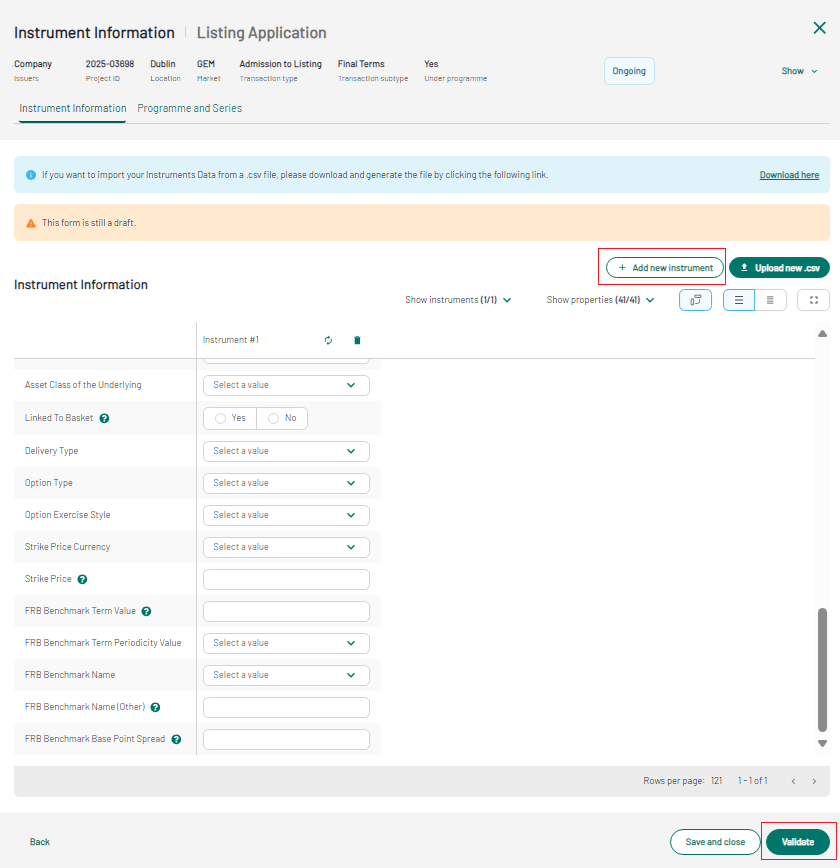
9. Add new instrument
Click on "Validate", a light blue banner is displayed stating: "Wait for Euronext approval". The project folder will update accordingly, and the "Check" icon is displayed near the task.
Issuer Documents
From the "Issuer Documents" section, you will be able to verify or upload the required documents, categorised as follows:
- Final Terms Listing documents
At the top of the page you will find the "Final Terms Listing documents", differentiated between Required documents (Final Terms) and Optional documents (Payment Confirmation). The Payment Confirmation document is expected when the selected payment method is "Wire Transfer".
Please make sure to upload you "Payment Confirmation" before click on confirm button and close the task.
To upload a Final Terms, click on the “upload arrow”” available next to the document type in the Issuer document section. The final term upload box will appear.
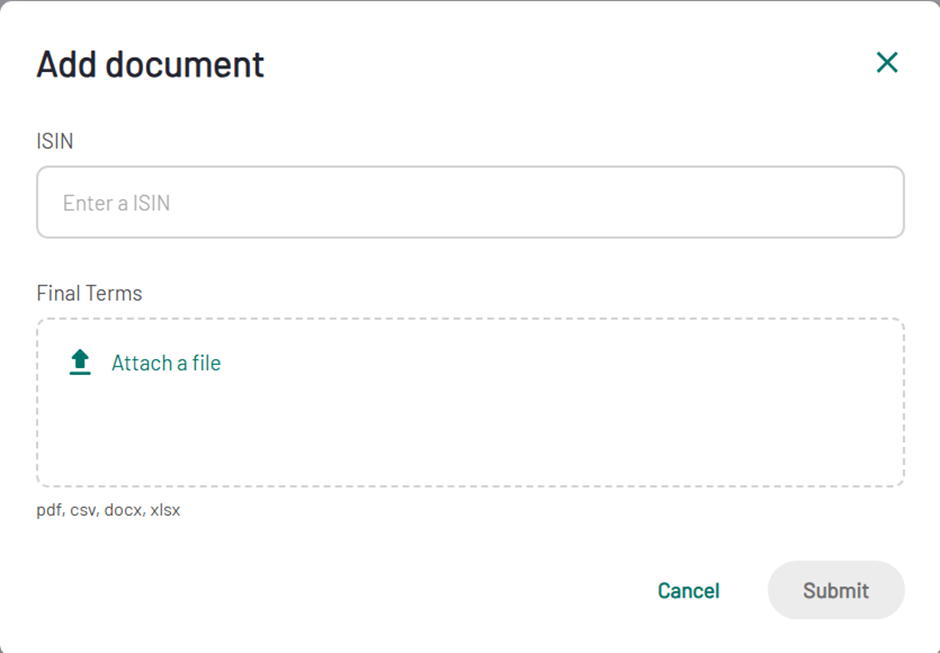
10. Issuer Document - Upload documents box
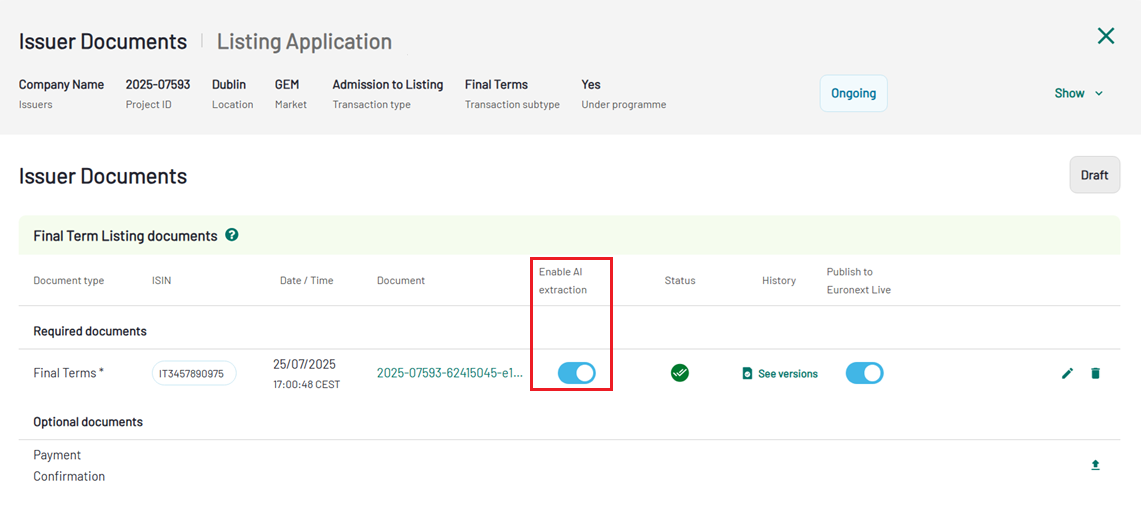
As soon as each document is uploaded, it will go through an antivirus scan and you will see the status “Processing ongoing”. Refresh the page to see the results of the scan. Once the scan has been done, the status will then be “Completed”.
If you want to proceed with the AI extraction, the dedicated toggle must be active.
11. Instrument Information - Enable AI Extractor
When all the needed documents are uploaded, click "Complete" button.
This is how the Project Folder looks like when you select the AI Extraction option. The progress bar will inform you on the processing of the the extraction and the antivirus scan. Both Instrument Information and Issuer Document will display the mouseover status "Extraction in progress". At the end of this process the Progress wheel on the Project folder will be 45% completed.
12. Project Folder
When the extraction is completed, the Instrument Information form will be prefilled, based on the information available in the Final terms document. The manual fill-in option, and the upload option are available anyway.
13. Instrument Information - AI Extraction completed
Click on "Complete" button to close the Instrument Information page.
Pro-Forma
By selecting "Wire Transfer" as a Payment Method at project level, the Pro-forma is automatically generated, and available for you to download. Pro-forma generation can take several minutes.
14. Project Folder - Pro-forma
Edit
If you need to update / change a document you have previously uploaded, when Instrument Information, Issuer Document and Pro-forma (if any) are available, click on "Edit" button to reopen the sections, that will turn to "Not Complete".
15. Project Folder - new Edit button
Once all the steps of the Listing Application are completed, the Submit button on the Project folder is enabled. Click on it to submit the request to Euronext for validation.
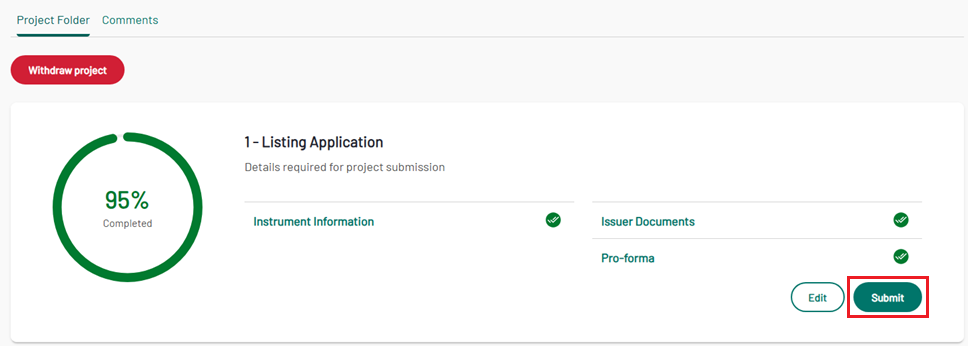
16. Project Folder - new Submit button
After the submission, the progress percentage of the Listing Application section reach 100% of completion, and the project status is "In Review"
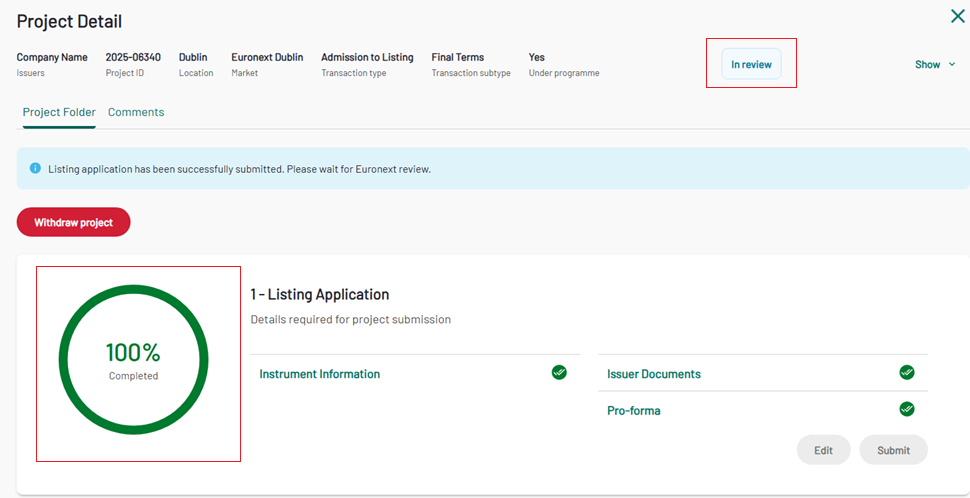
17. Project Status update
Listing Finalisation phase
When Euronext has validated the Listing Admission phase, and the project is in the scope of a Public offer, the project status turns to "Awaiting customer update". The Public Offer Listing Finalisation is only required in the Public Offer scenario.
When the Public Offer period ends, you will need to log in your application, find the relevant project and submit the "Article 17" and the updated "Final Terms" documents from the dedicated section.
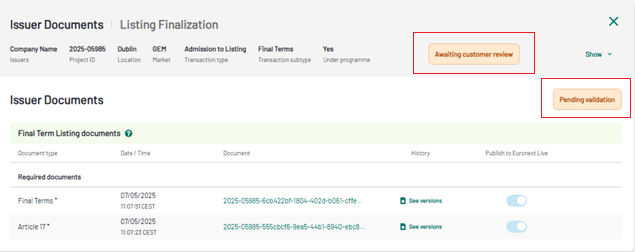
18. Listing Finalisation - Issuer Documents
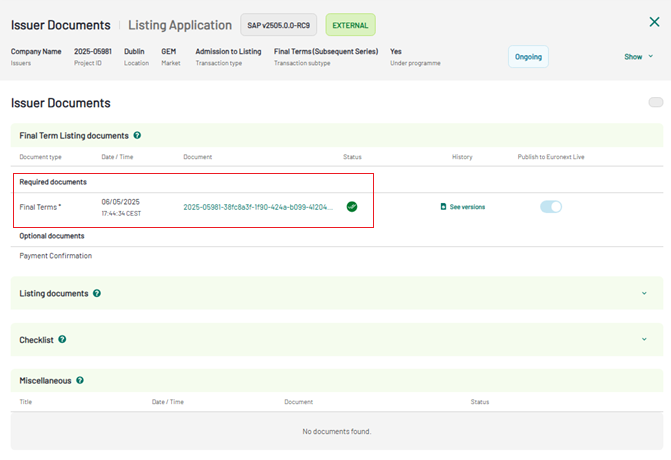
Please remember that you cannot change the file type (if the first uploaded file was a PDF, the new file must be a PDF). If you have uploaded a wrong file type (format) please delete it and replace with the correct file format.
The new file version will be available on the main Issuer Document page, with the upload date and time.
19. Issuer Document - main page
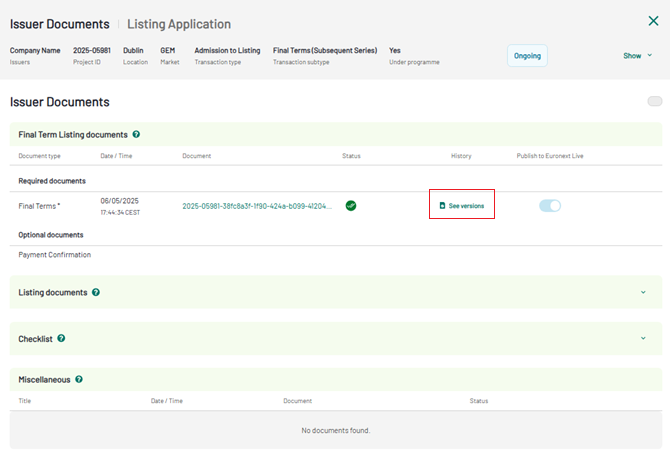
You will find the previous file version by clicking on "See versions" of the History column.
20. Issuer Document - main page

21. Issuer Document - History section
You will also need to populate the "Nominal amount" and "Security Description", form the Instrument Information section.
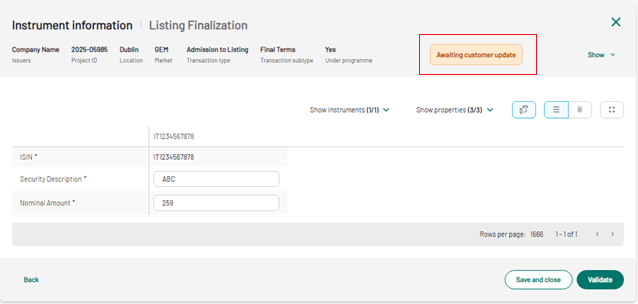
22. Listing Finalisation -Instrument Information
Once these tasks has been completed and validated by Euronext, the Project status will be "Awaiting final review", the project status will change into "Executed" and the "Admission Notice" will become available.
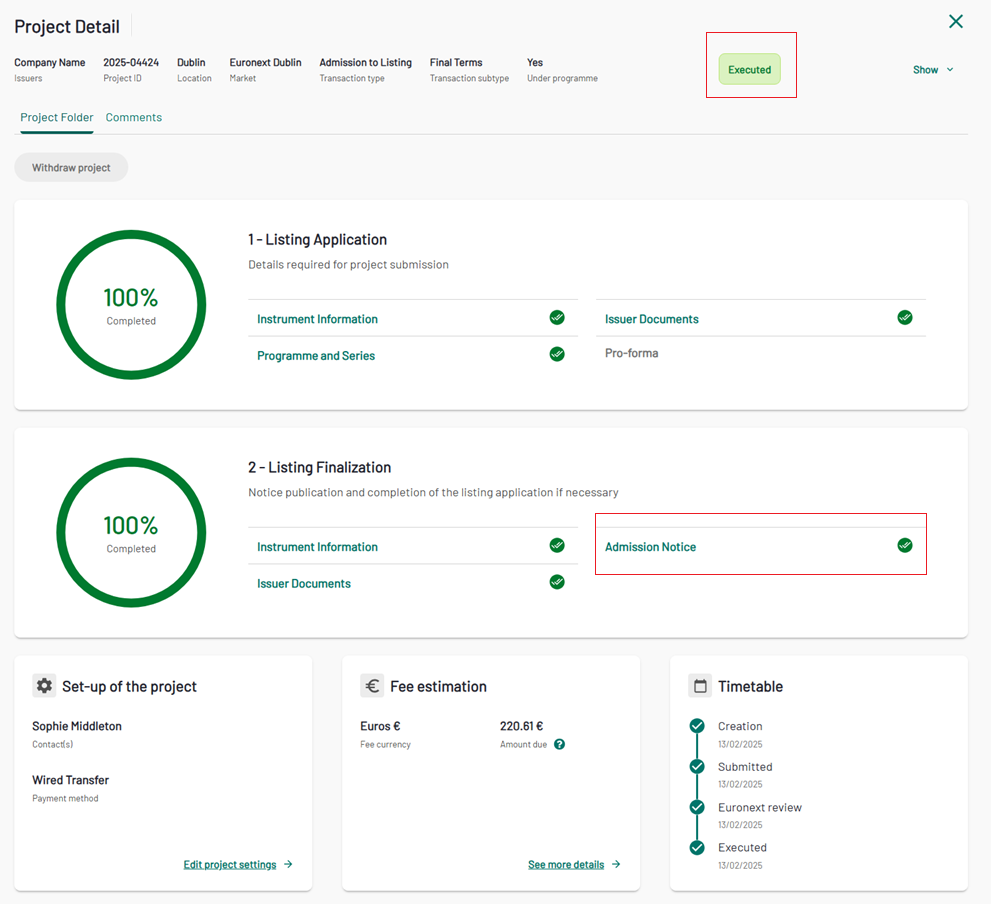
23. Project Folder - Admission notice
Project withdraw
Click on "Withdraw project" on the project folder, if you want to cancel your application. After the withdraw, all the information linked to the project will remain available on read only mode only, and no other action are allowed.

24. Withdraw Project
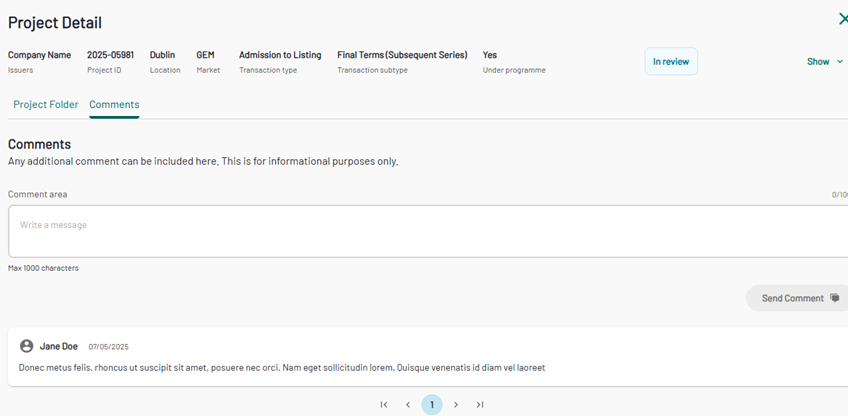
Comments
Use the Comments section if you need to communicate something to Euronext. Type the message in the comment area (max 1000 chars) and click on "Send comment" to submit it to Euronext and to see it appear in the dedicated section.
25. Comments tab
Project Statuses
During its lifecycle, the project will assume different status, which are represented below:
| Status | Description |
| Draft | The project creation starts, and "Save and Close" button is clicked. The project creation is not completed |
| Ongoing | The project is created |
| In review | The project is sent to Euronext for data review |
| Awaiting customer update | All data of the Listing Admission phase have been validated, and the project is in the scope of a Public offer. With this status, the Listing Finalisation phase is enabled |
| Awaiting customer review | The Project is in scope of a Public offer, and the update of the Listing Finalisation phase have been done |
| Awaiting final review | All data have been validated by Euronext and the Admission Notice is being generated |
| Executed | The project is completed and the Admission Notice is available on the Project Folder |