Manage your company contacts and teams
Consult the list of contacts and users
From a Company Card, you can consult its contacts by clicking on “List of contacts” on the “Company contacts” tile. The tile shows the company’s total number of contacts and those with a “Pending approval” user role status.
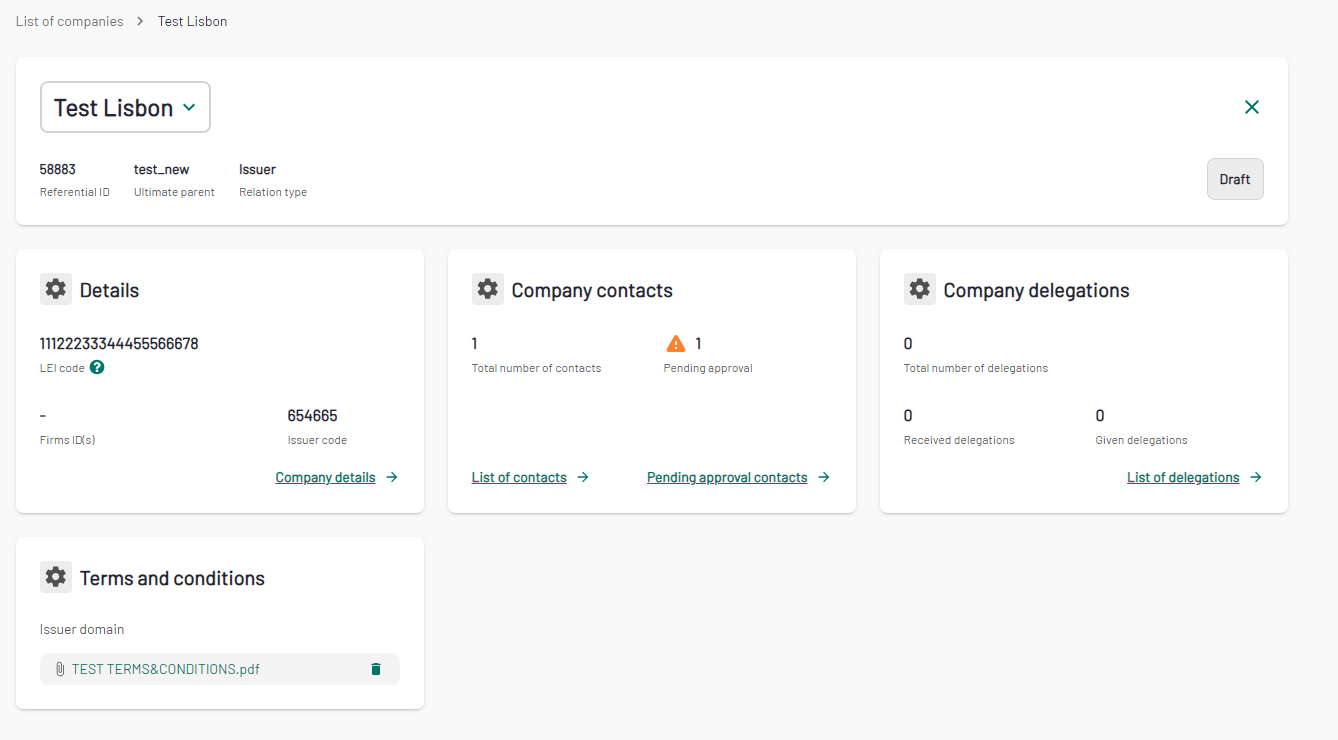
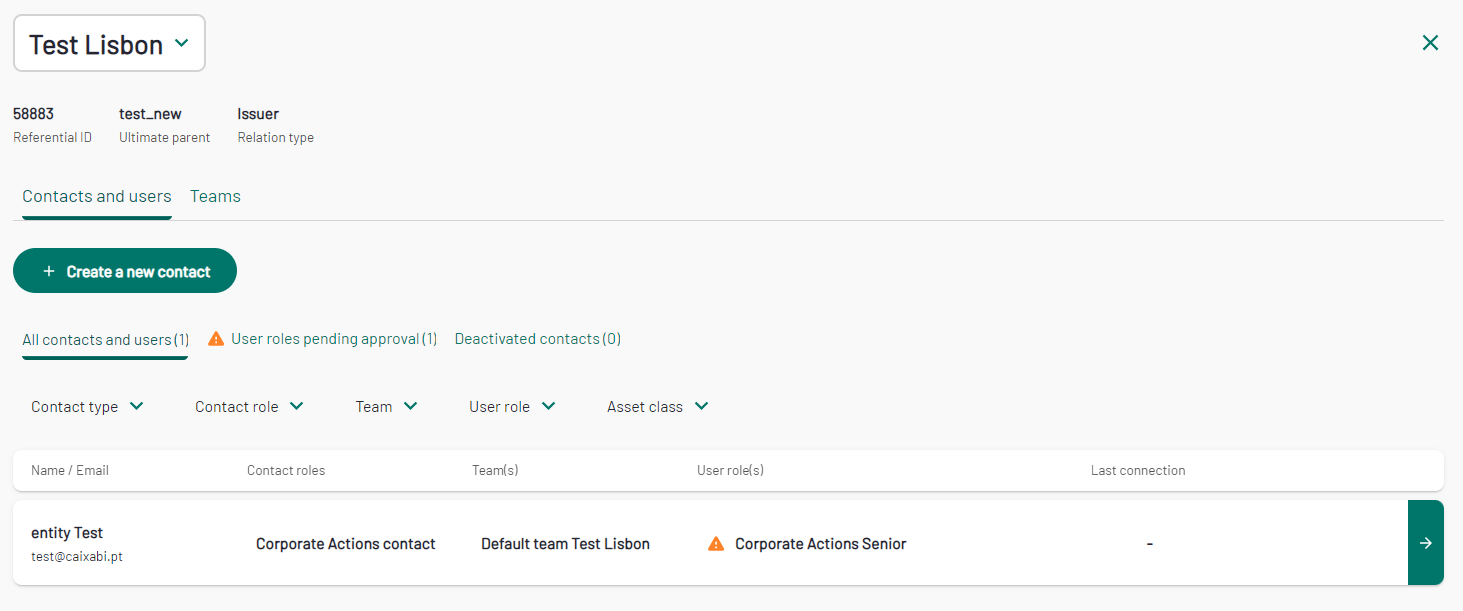
Note that a contact can be a physical person, a technical entity or a group of people (team). The “Contacts and users” tab is where you manage all contacts and roles.
In the list, you can see the name and email address of the contact, their MyEuronext user roles, their teams and their last connection date.
Create a new contact
If you are allowed to, you can add a new contact to the company. Under the "Contact and users" tab, click the “Create a new contact” button.

For each new contact, you will have 2-step form to fill: Contact details, and User roles (optional).

Contact details
Physical person :
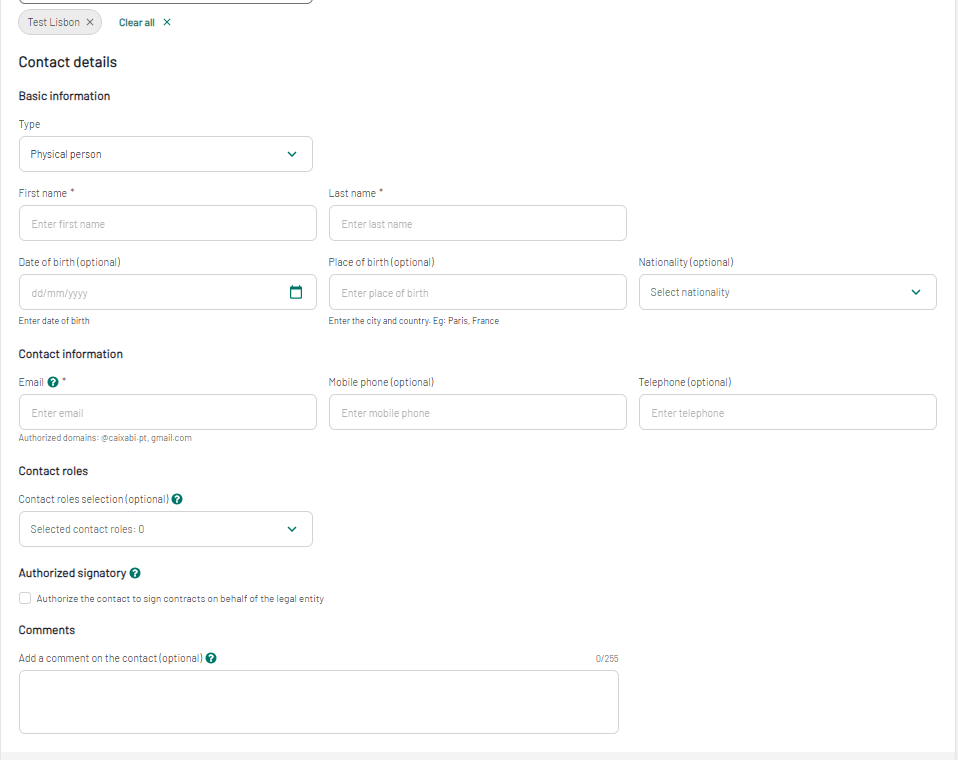
You will be required to fill several fields.
First, you need to choose a company name in the company details section. The contact’s company is selected by default. However, it is possible to add another company. It is possible to be attached to several companies of a same group (with the same Ultimate parent).
Note that it is mandatory that a contact is linked to at least one company.
Then, complete the basic and contact information. The date of birth, place of birth and nationality are optional, and their visibility is reduced to a small number of users : the administrators.
Finally, you can specify the contact role(s) (different from the user role) of the new contact. Euronext will consider your contact role as what you represent within your company.
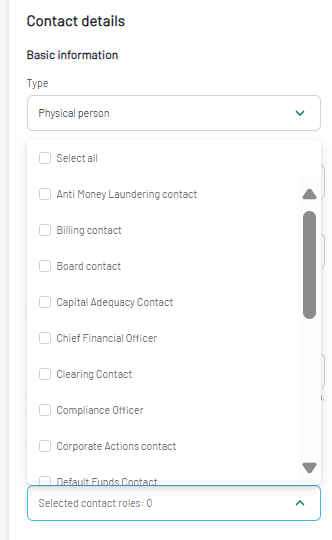
If the contact is authorised to sign contracts on behalf of his legal entity, you can tick the corresponding box. The contact will be then proposed through MyEuronext when a contract is to be formally signed by the legal entity.

Moreover, as an option, you can add a comment to the contact. Note that comments will be visible for everyone.
Technical entity / Group of Persons :
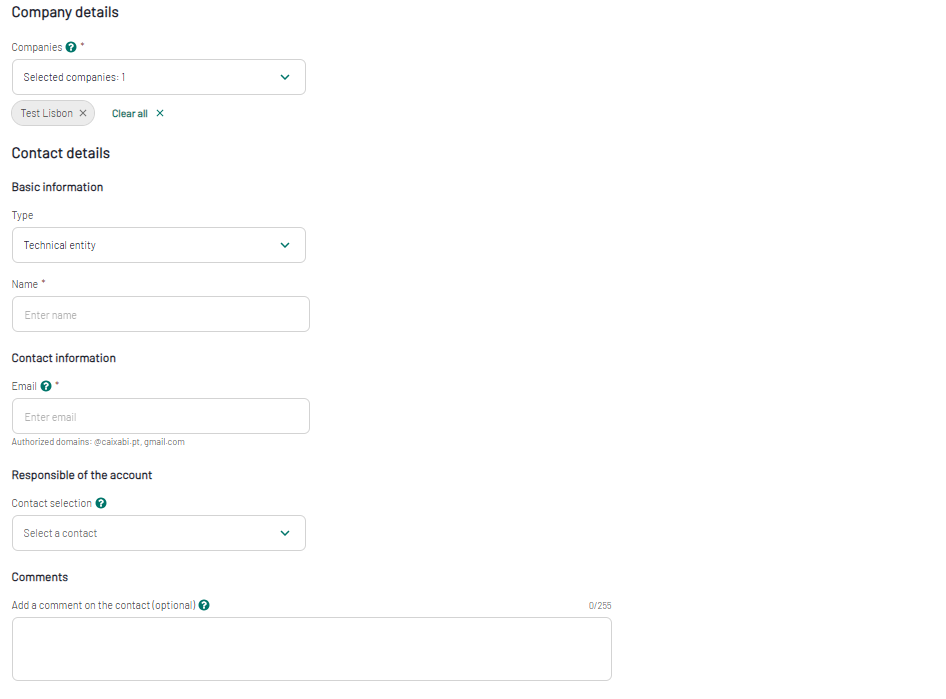
A technical entity or a Group of persons can be a generic email address used by several people in a company. Note that all technical entities need to be assigned a responsible of the account that is already present as a contact.
Duplicate detection:
If the app detects a potential duplicate (e.g.: same name with different domain name), a red banner will appear as well as a pop-in. It is not allowed to have two contacts with the same email address. But if these are two different contacts with the same name, you can confirm the contact is not a duplicate, and decide to continue creating the contact.

User roles
This step can be skipped : if your will is to declare a new contact for the company without giving him/her any access to MyEuronext, just click on “Skip this step” in the blue banner, or on the "Go to summary" button on the previous step.
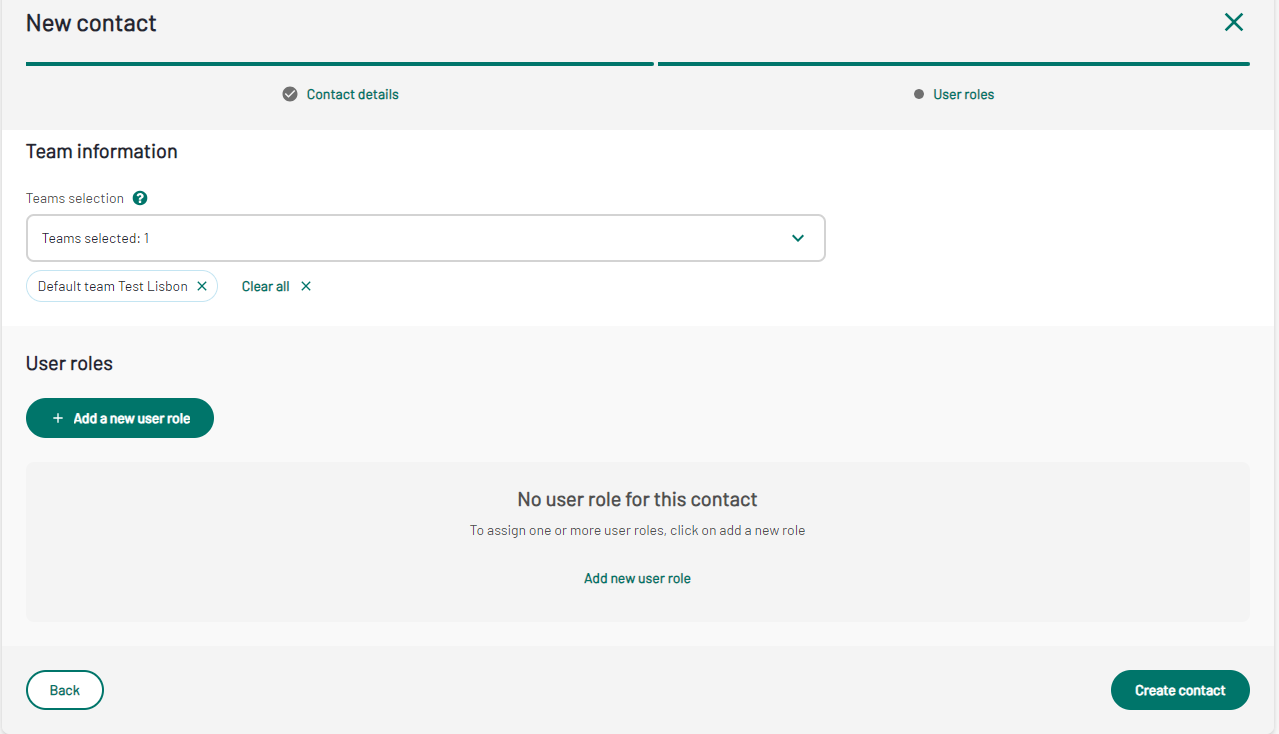
Please note that new user roles can be added afterwards. The following are the roles that can currently be granted and their short description:
Issuer domain user roles
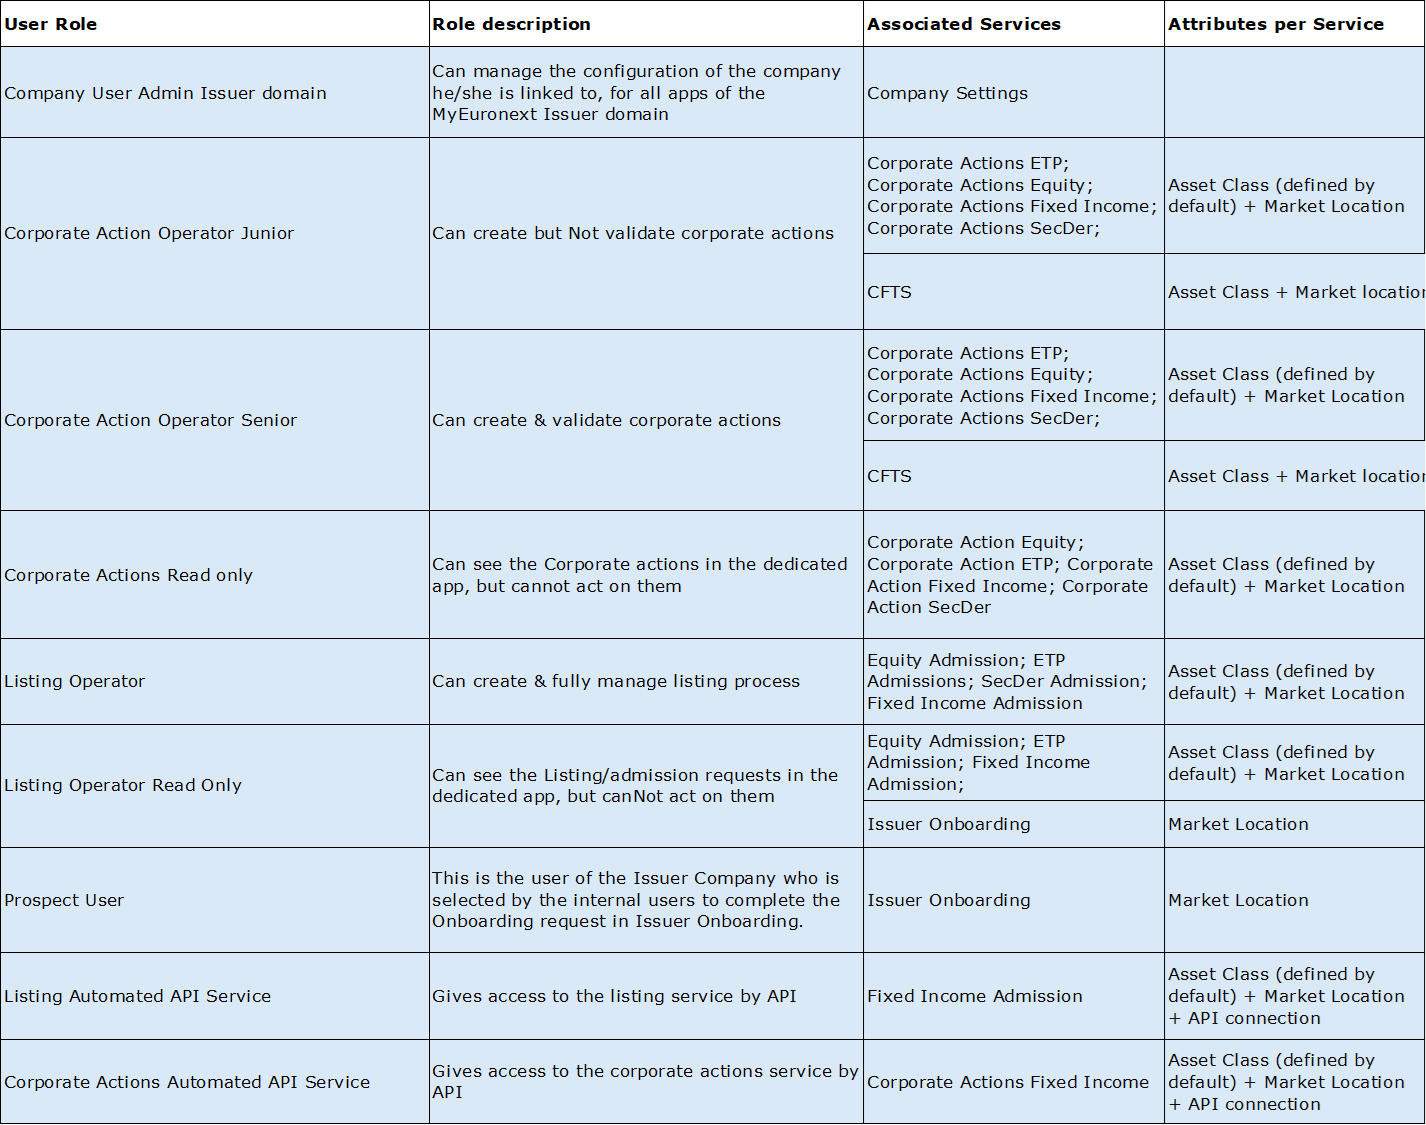
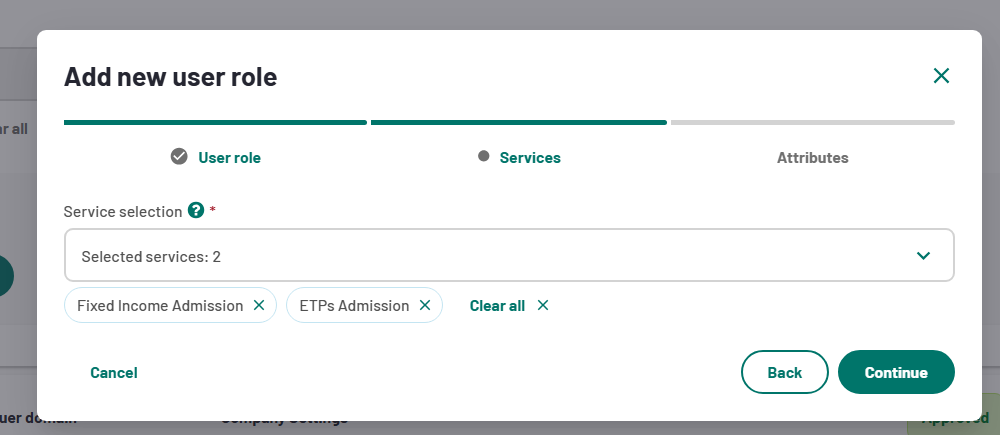
For each issuer domain role, you need to choose the service(s) on which the user will be authorised to intervene. Note that for each service you will need to select the right the attributes.
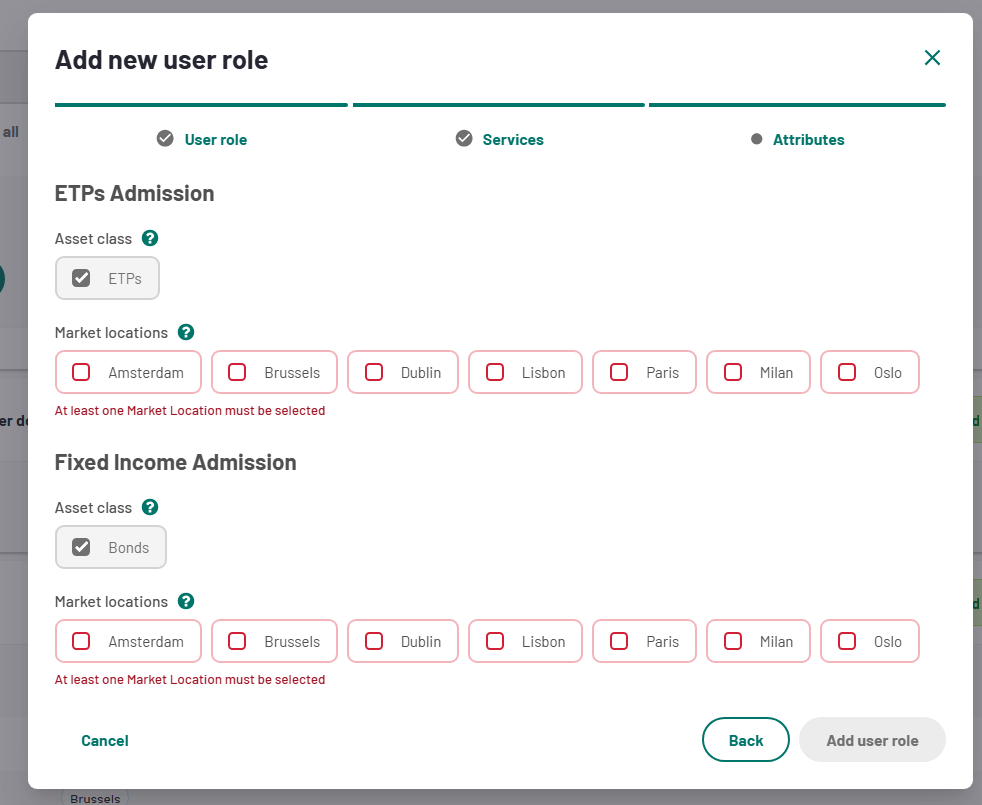
On the attributes, you need to choose at least one asset class and one market location.
A pop-up will appear to allow you to select the user role and its details.
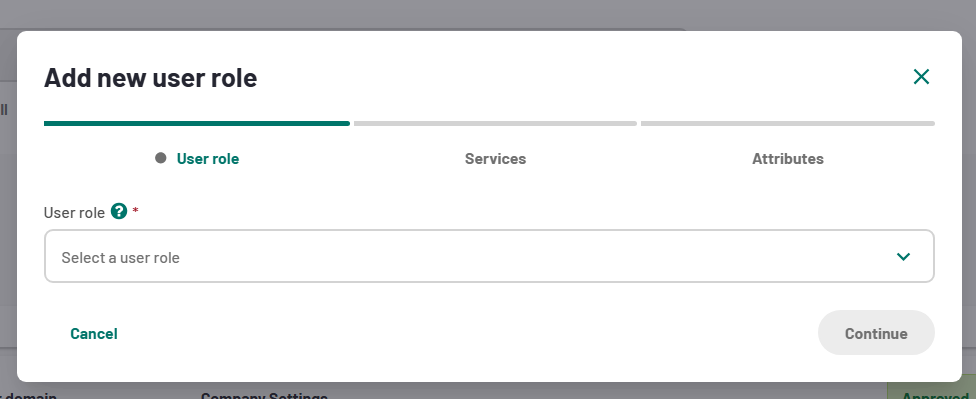
As soon as you choose the user role, you will be able to choose the service(s) in scope of the role.
Then select the right attributes for each service.
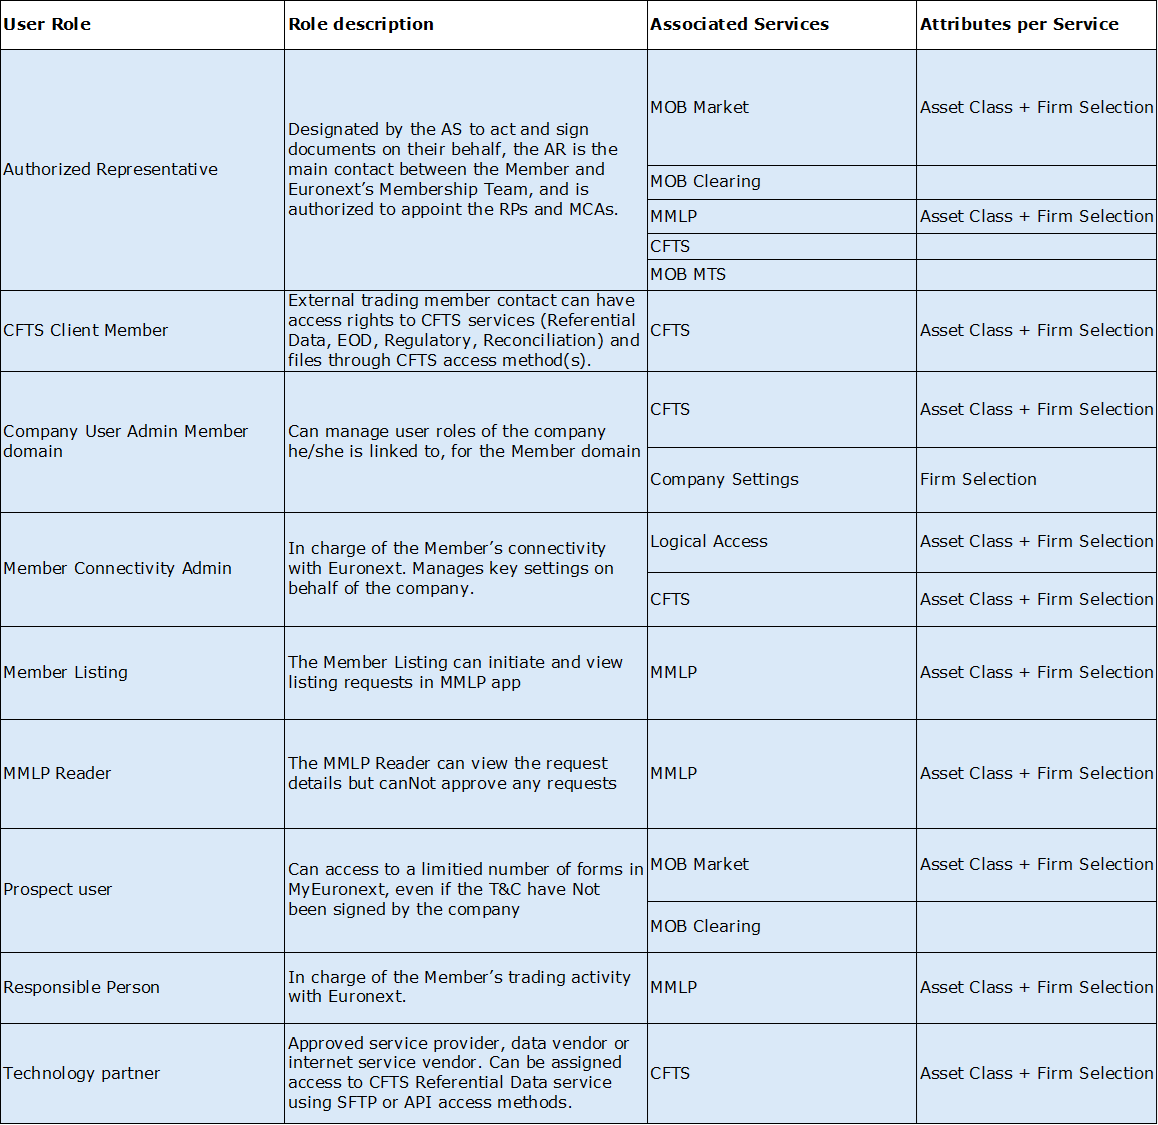
Member domain user roles
Member MTS domain user roles
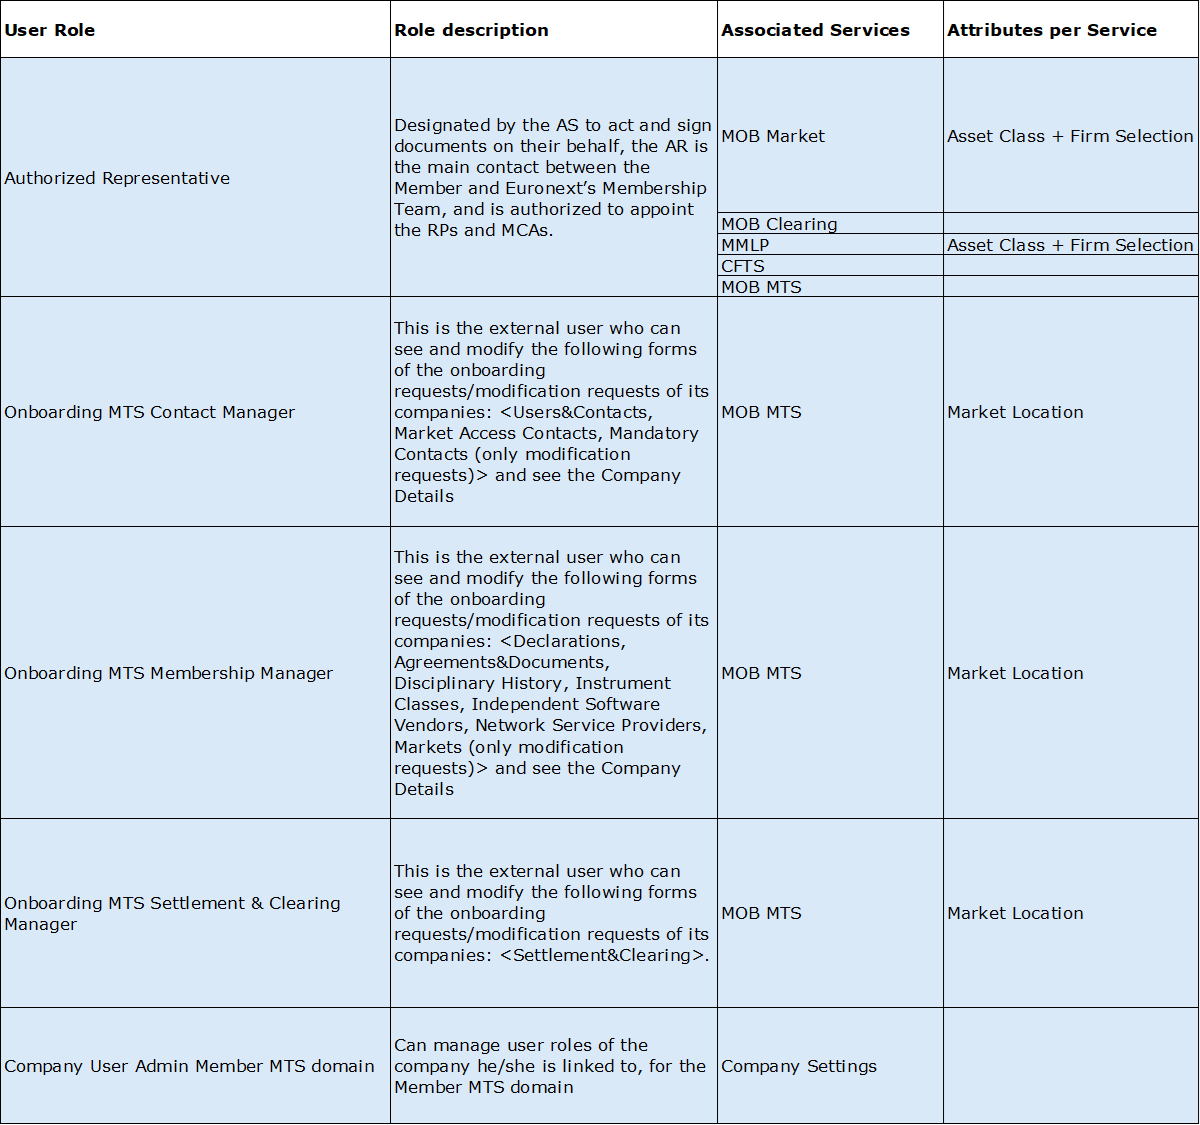
Note that a contact can receive as many user roles as needed.
For member domain roles, you need to select the service(s) on which the user will be able to act and select the relevant attributes for each service.
A pop-up will appear to allow you to select the user role and its details.
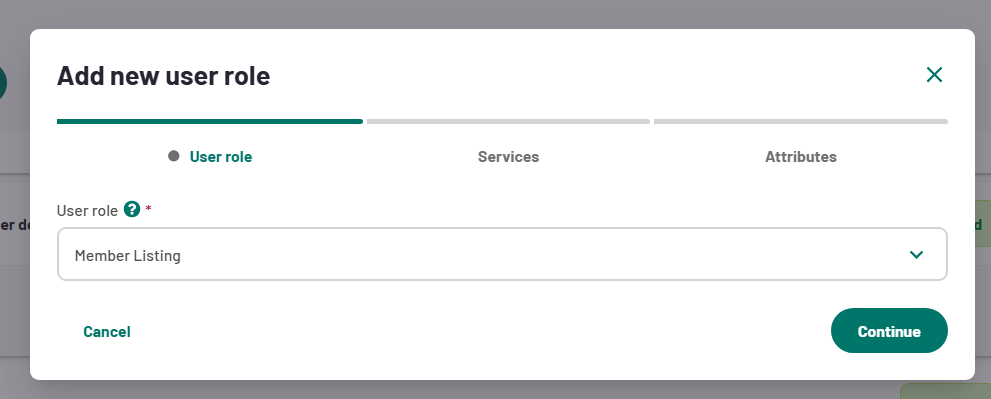
As soon as you choose the user role, you will be able to choose the service(s) in scope of the role.
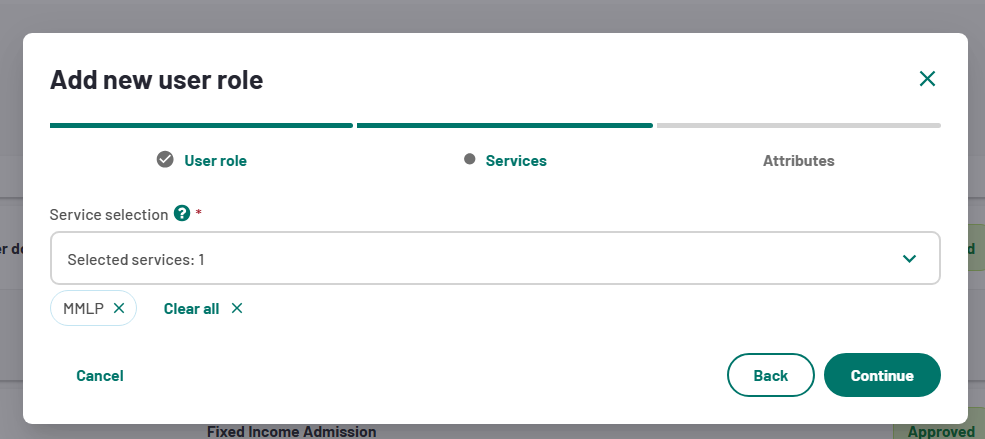
Then select the right attributes for each service.
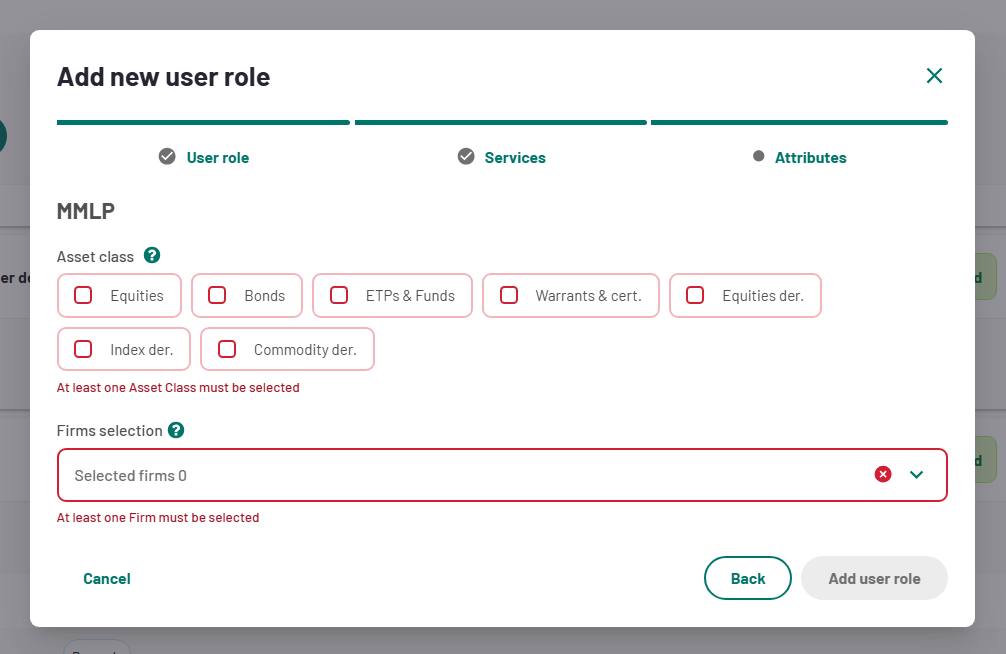
You can then click on “Add user role" and it will be added to the list.
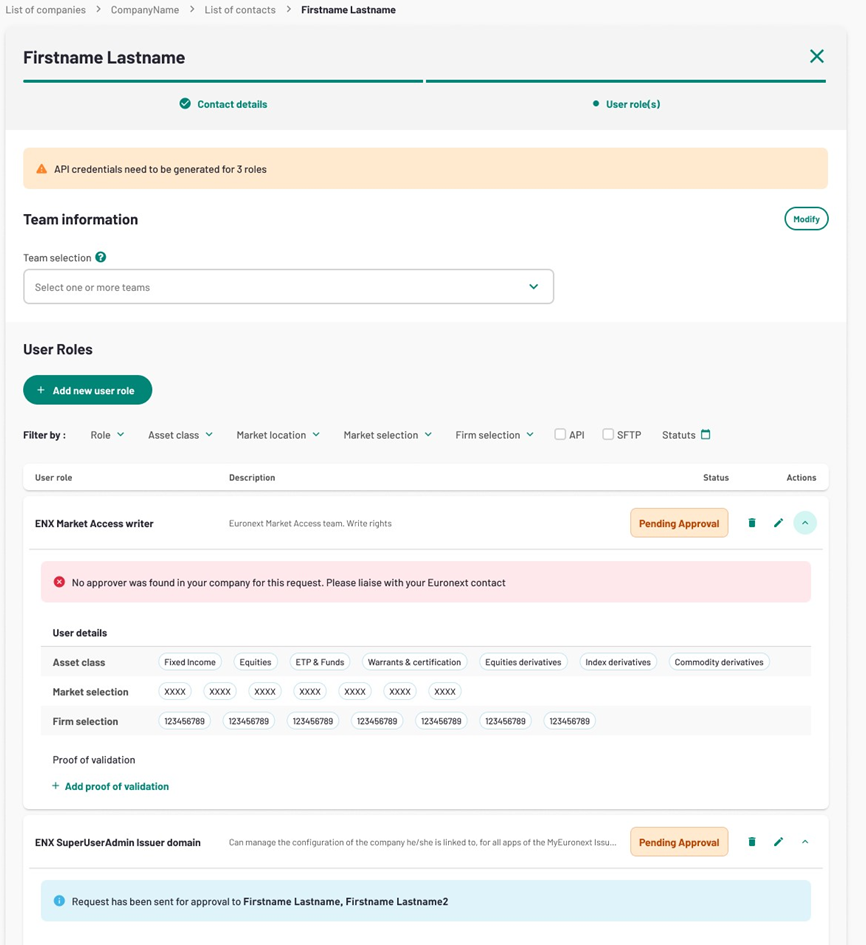
Some new roles need to be approved by the relevant people within a company. Indeed, you will see a blue banner on the newly created role, indicating who in your company is able to approve it.
At every new user role request, the system will calculate who among the company can approve the requested user right. The rules take into account the kind of user role requested but also the perimeter in terms of Asset classes and market locations (and firms for Member domain).
If the system finds approvers, you will see their name in the blue banner, and an e-mail will be sent to ask for their approval.
If the system does not find an approver, you will see it in a red banner. This means no one is currently set in the company to approve this user role (often can be a matter of Asset Class perimeter). Please liaise with your Euronext contact as Euronext will be in a position to unlock such situations.
It is not possible to auto-approve a role.
API user role
For the issuer domain role, please note that when choosing the role “Listing automated API Service” or “Corporate Actions Automated API service”, you will be able to access an API service that allows you to generate API credentials.
These credentials (“client ID” and “client secret”) can only be generated once the user role is created.
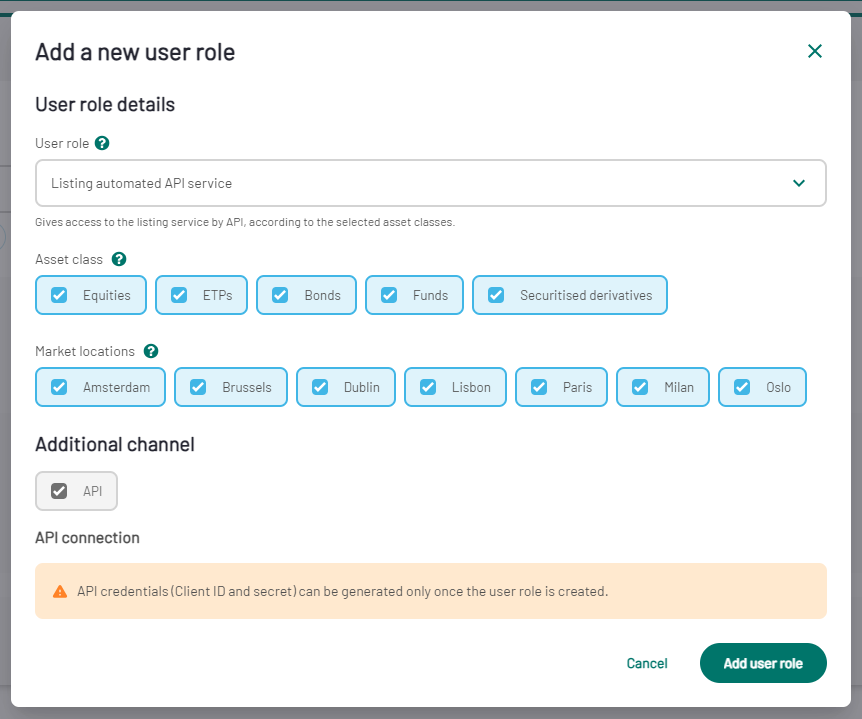
Click on “Add user role”, then click on "create contact" to finalise the creation.
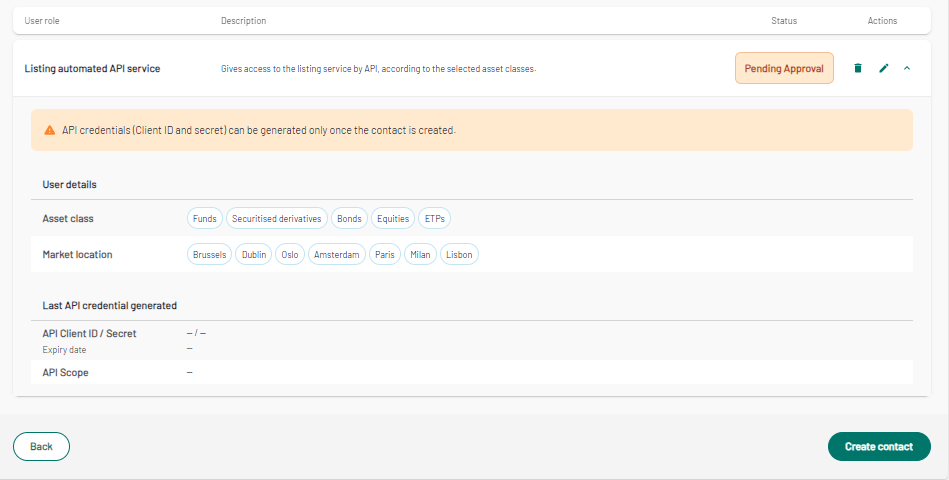
Once the contact is created you will be able to go back to the user role to generate the API credentials :
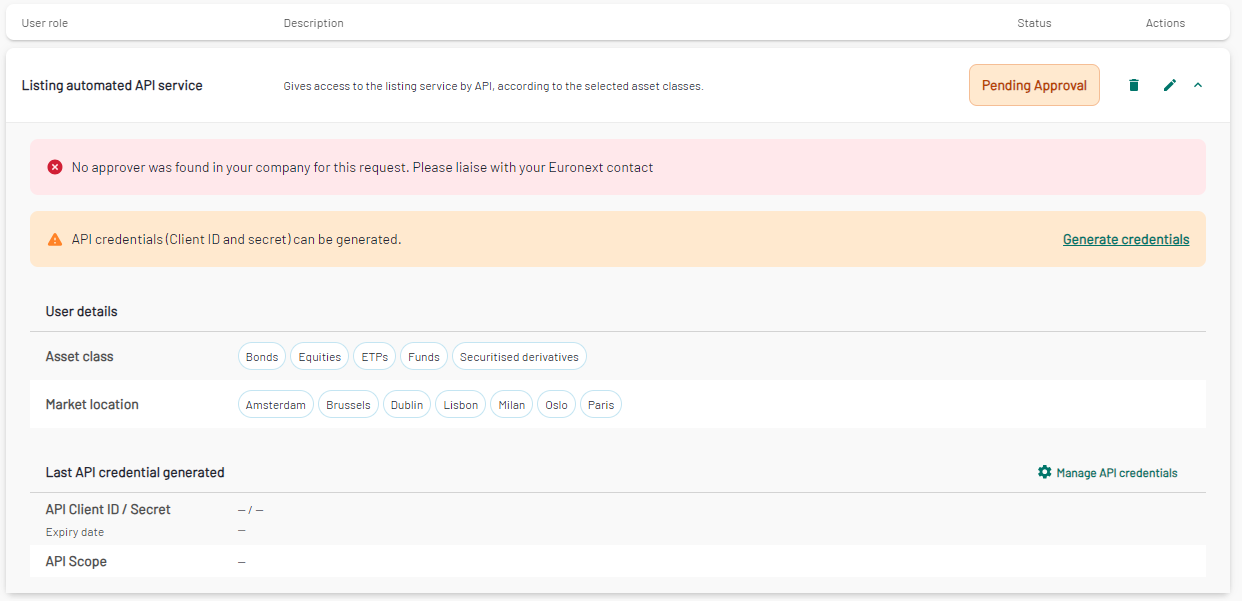
Click on "Generate credentials", a pop-in will appear enabling you the create these credentials :
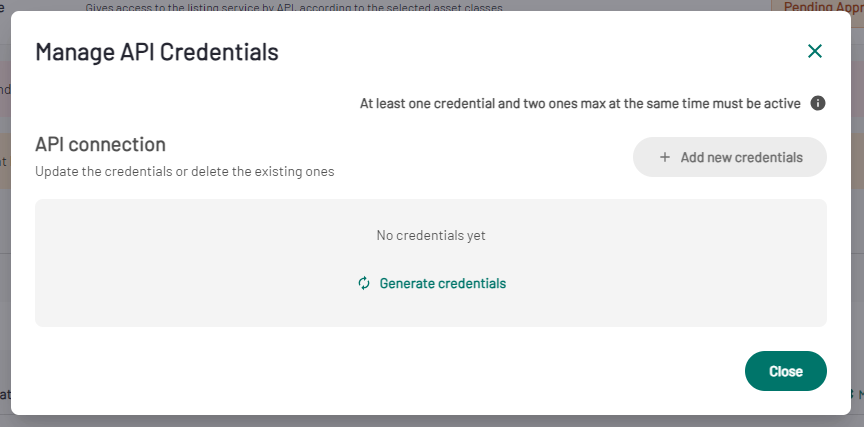
The credentials are then created. They will be valid for 90 days.
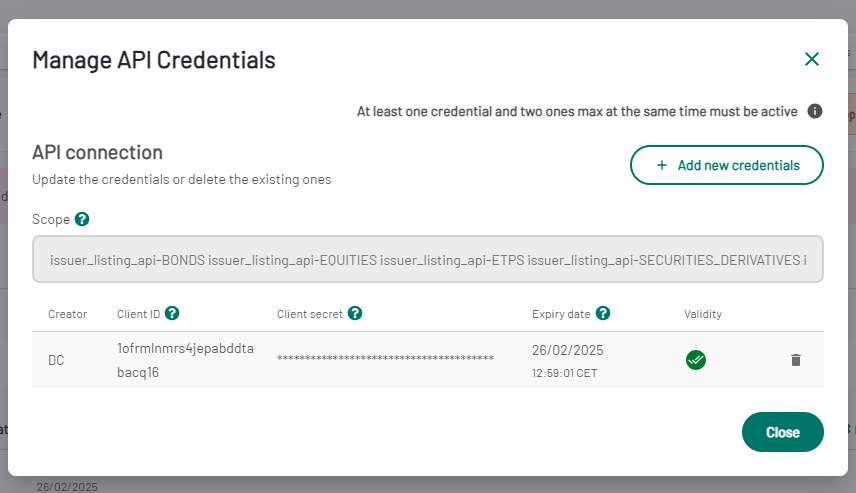
Please make sure to copy the Client Secret key straight away, as it shows only once at the creation step.
In case of loss of the credentials, you can generate new ones by clicking on “Add new credentials”.
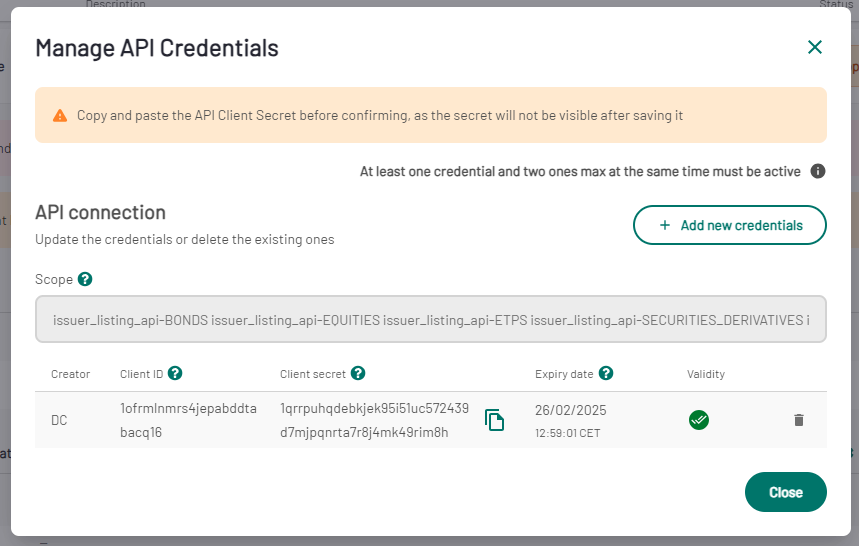
In case the credentials are corrupted, you will need to first generate new ones by clicking on “Add new credentials” and delete the existing credentials by clicking on the dustbin.
Modify a contact
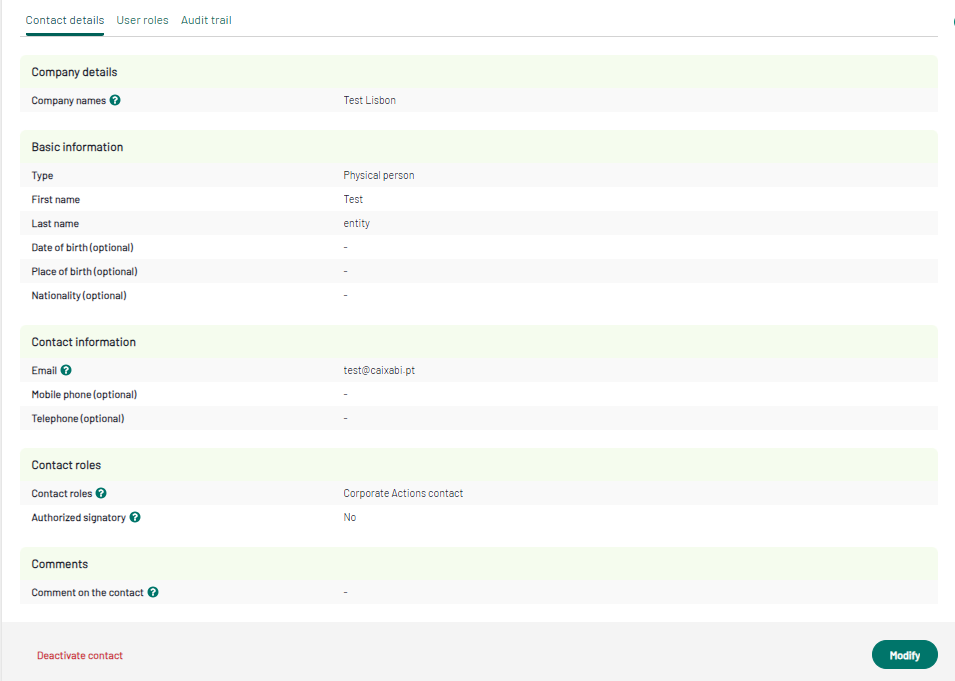
When consulting a contact's details, if you have access to the “Modify” button, you can edit some of the contact information.
You will only be able to modify the basic information. Only some authorised users (User Admins) can change the legal entities a contact is linked to. Note that first name, last name, phone number and email fields will be greyed-out and not editable if they have been registered in Connect. In this case, to modify this information, please go to Connect.
Modify a team
If you have the rights to, you will be able to modify teams.
To modify a contact’s team, go to the contact's card, then on the “User roles” tab: click on “Modify”.

Modify a user role
If you have the rights, you can modify or add user roles in the user roles rubric of a contact. In a contact details “user role” tab, click on ”Modify”. You will then be able to modify asset classes and market location for issuers and firms for trading members. You can save your modifications when you are done. A pop-in will appear asking for your confirmation. Note that the associated permissions will be lost immediately, until the new approval.
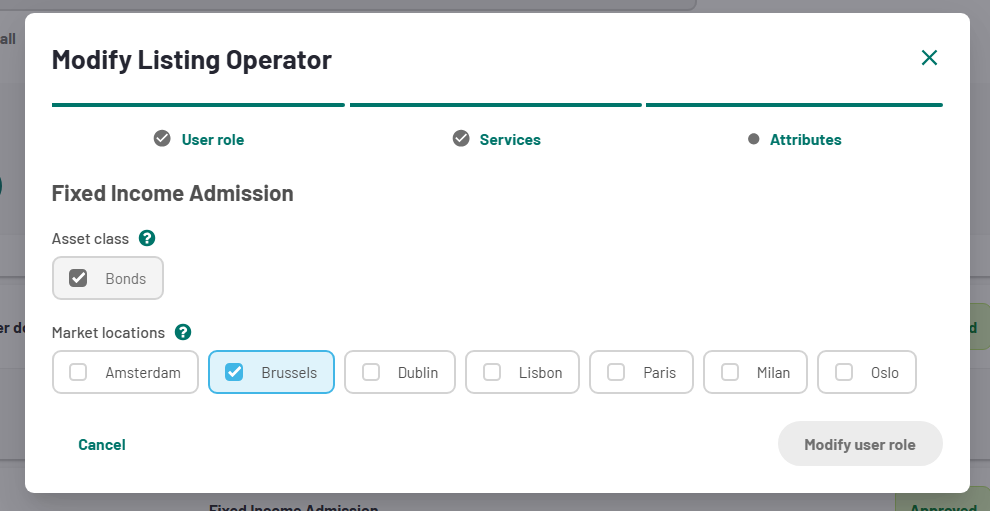
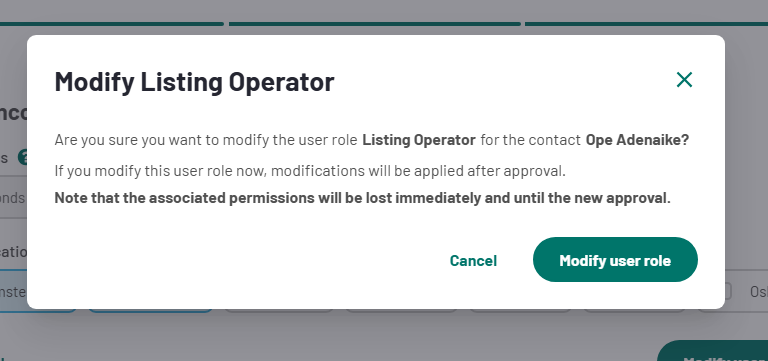
Please note that in case of modification of the roles “Listing automated API Service” and “Corporate Actions Automated API service”, new API credentials need to be generated.
Approve or reject user role(s)
Depending on your role, you can be asked to approve or reject other user roles.
To validate a user role, look at the "User roles pending approval" tab of the "Contacts and users" tab of a company. User roles with a “blue tick” are approved, those with an “attention sign” need to be approved.
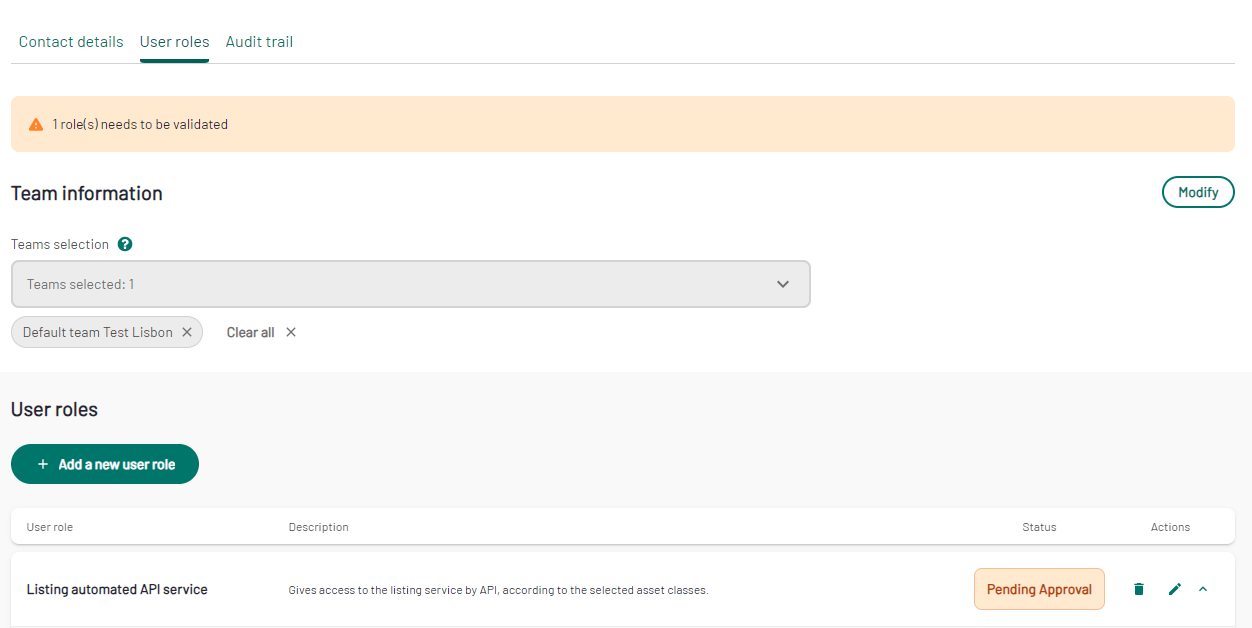
If you are an “approver” for a role you will see the following:
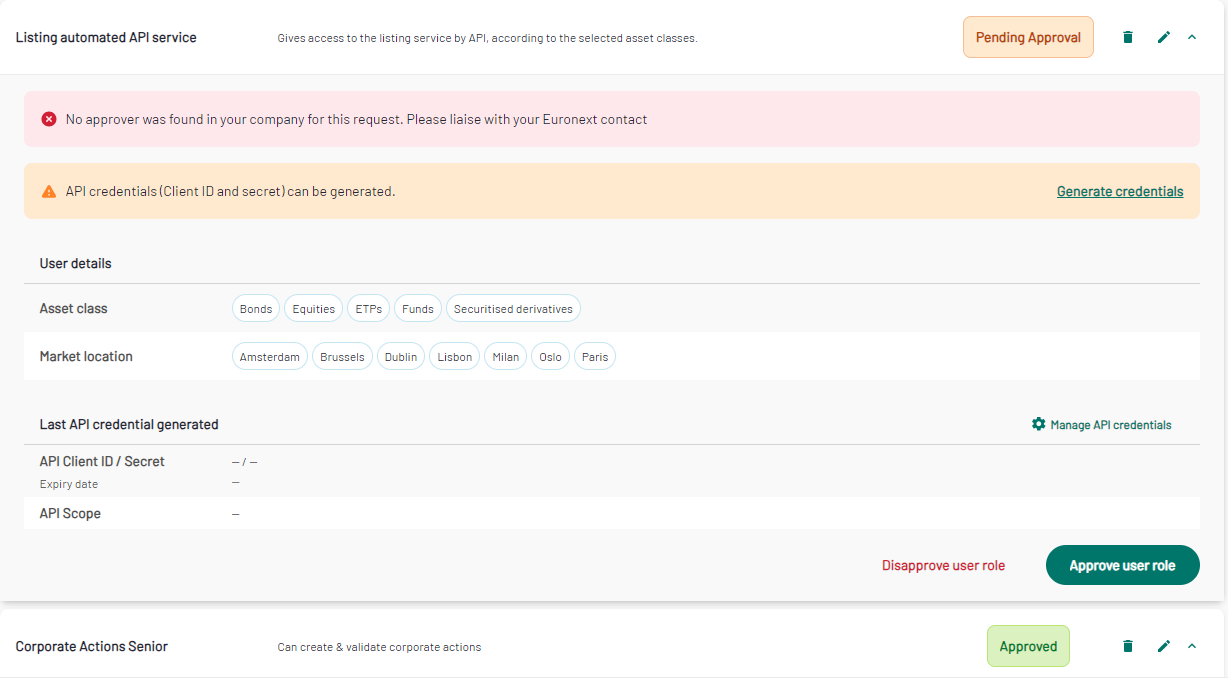
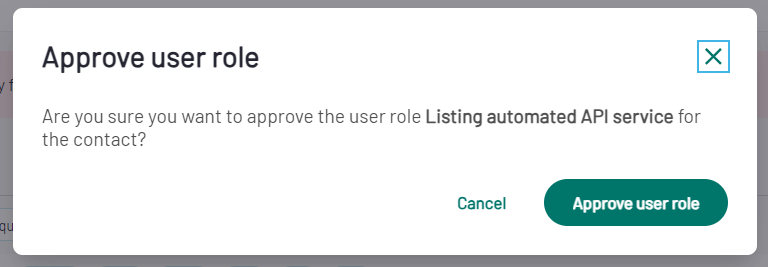
If you choose “Approve user role”, a pop-in will appear to confirm you want to approve the user role. You can click on “Approve”.
However, if you choose “Reject user role”, a pop-in will open, asking you to precise the reason of the rejection. You will then click on the “Reject user role” button.
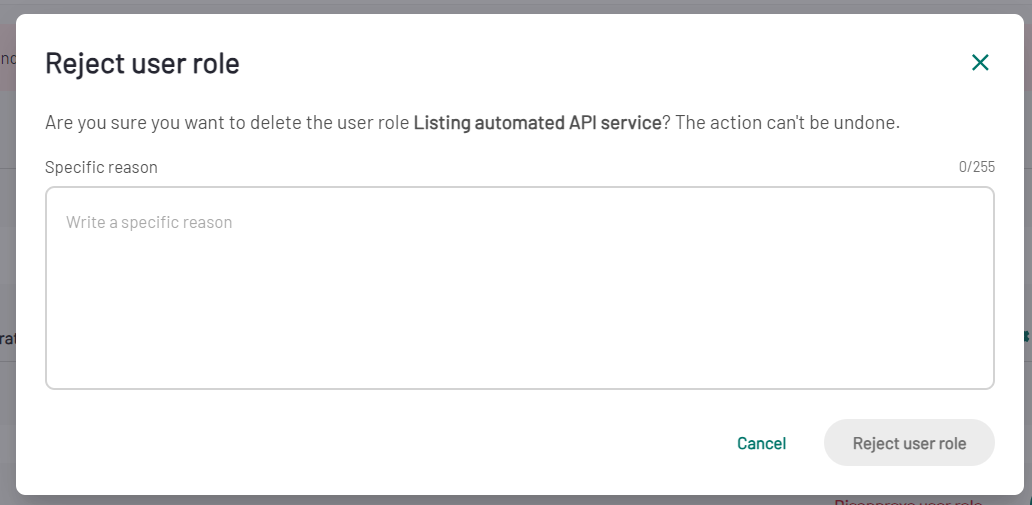
Note that when you approve or reject a user role, the contact is notified by email. In case of rejection, the reason will be stated in the email.
Delete a user role
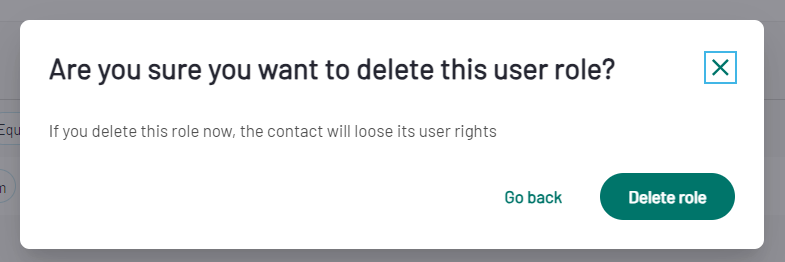
If you are allowed to, you also have the possibility to delete a user role. In this case, the contact will lose their user rights. Click on the dust bin icon besides the specific role.

A pop-in will appear asking for your confirmation. Click on “Delete role”.
Deactivate a contact
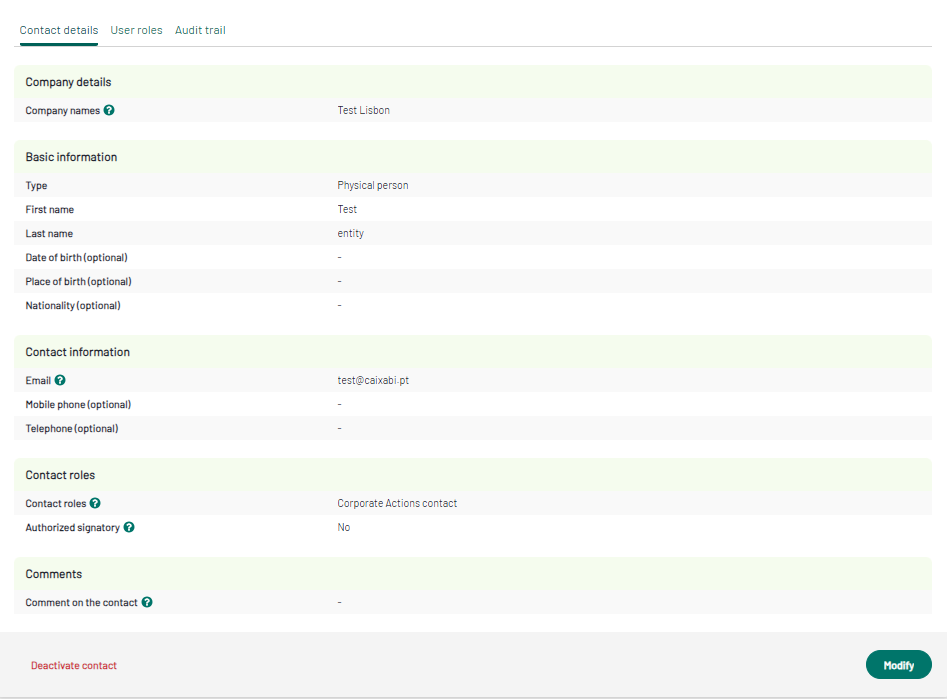
If needed, it is possible to deactivate a contact, from its contact details page. The user will lose all their role(s) immediately. To do so, click on the red button “Deactivate contact”. A pop-in will appear, asking you to confirm your decision.

Reactivate a contact
It is possible to reactive a contact from its contact details page, however, their user role(s) and team(s) will have to be added and approved again.
If you want to reactivate a contact, open "Deactivated contacts" tab on the contact card.

Click on the contact you would like to reactivate. The contact tab will be open :
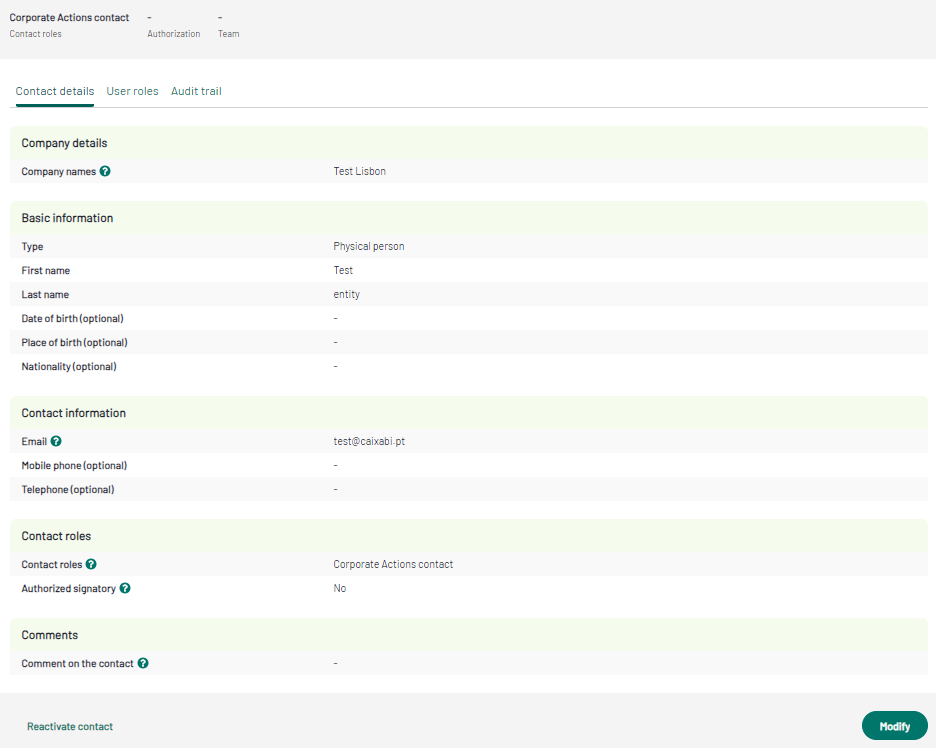
Click on "reactivate contact" on the bottom left of the tab. A pop-in is displayed stating that the contact has been reactivated :

Create a team
The same way you can modify a team, if you have the rights, you can create a team, to allow users to be assigned to this new team.
When you create a contact, you may want to assign a team. If you want to create a new team from the list, click on “ + Create team”.
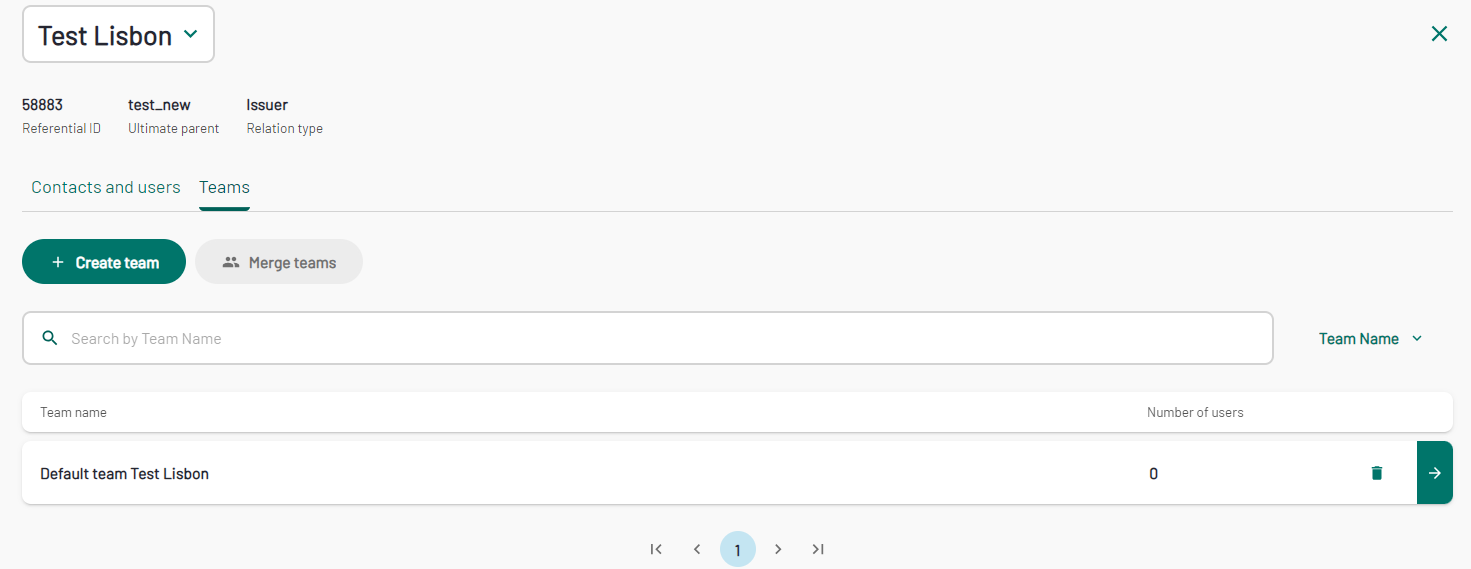
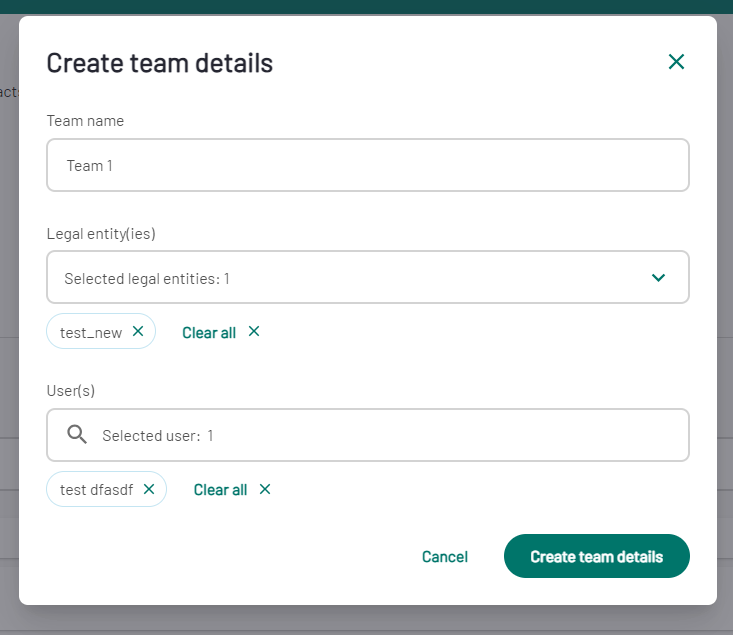
A pop-in will appear, asking you for the name of the team and the Legal Entitiy to which the team belongs. The selection of the Legal Entity will enable you to add users to your team. To have a multi legal entity team you can add several legal entities and select the team members from all the different entities.
Once the users selected, click on "Create team details" to create the team.
The team should now appear on the list.
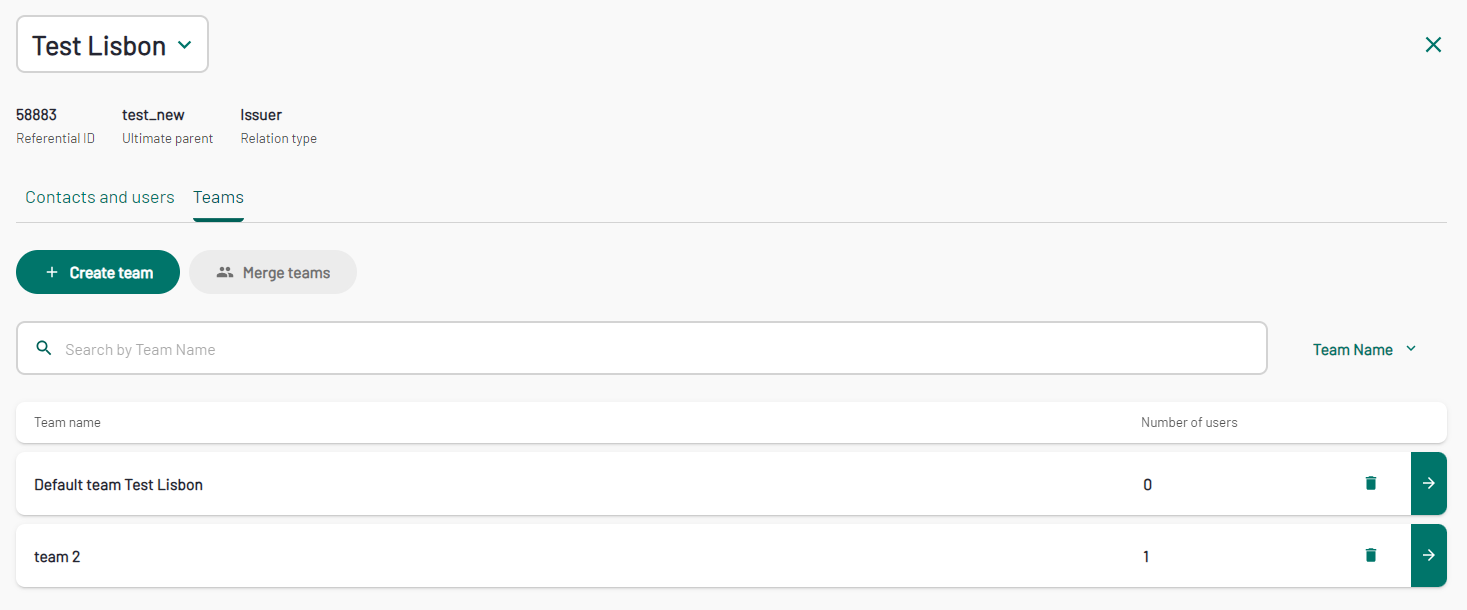
To modify a team's details, click on the team tile. The team tab will be open and you will be able to edit the details by clicking on the pencil icon.

You can modify the team name, legal entity and team users. Once the modifications are done, click on "modify team details" to save them.
Video sum-up

