
Fixed Income Admission - Amsterdam, Brussels, Lisbon, Oslo and Paris - Create a new project
Project Set-up process
Log in to MyEuronext and open the module. From the Project List, click "Create a new project" and complete the required fields in the Project Set-up form, including the market, transaction type, transaction subtype, issuer details and contact information. Click "Continue" to display a read-only summary of your entries, review the information, and then choose the appropriate action from the table below. When creating a listing project for Amsterdam, Brussels, Lisbon, Oslo or Paris, you will be asked to fill in the following information:
| Group | Fields | Notes |
|---|---|---|
Market | Location; Market | Select the relevant location and Euronext market. |
Issuer | Issuer name | Select the issuer from the available values. |
Transaction | Transaction type; Transaction subtype | The available subtype determines which tasks appear later in the project folder. |
Programme and clearing | Under program; Clearable indicator | Select the applicable Yes/No options. |
Public information | Public information access | Optional URL, where applicable. |
Listing | Listing date | Enter the date on which the instrument is intended to be listed. |
| Action | Result |
|---|---|
Create the project | The project folder is created immediately. The project appears as "Ongoing" in the Project List and becomes visible to Euronext. |
Save and close | The project is saved as a "Draft" in the Project List. No folder is created yet and Euronext cannot see it. You can return at any time to finalise and create the project. |
Cancel | All entered information is discarded. No project is created. |
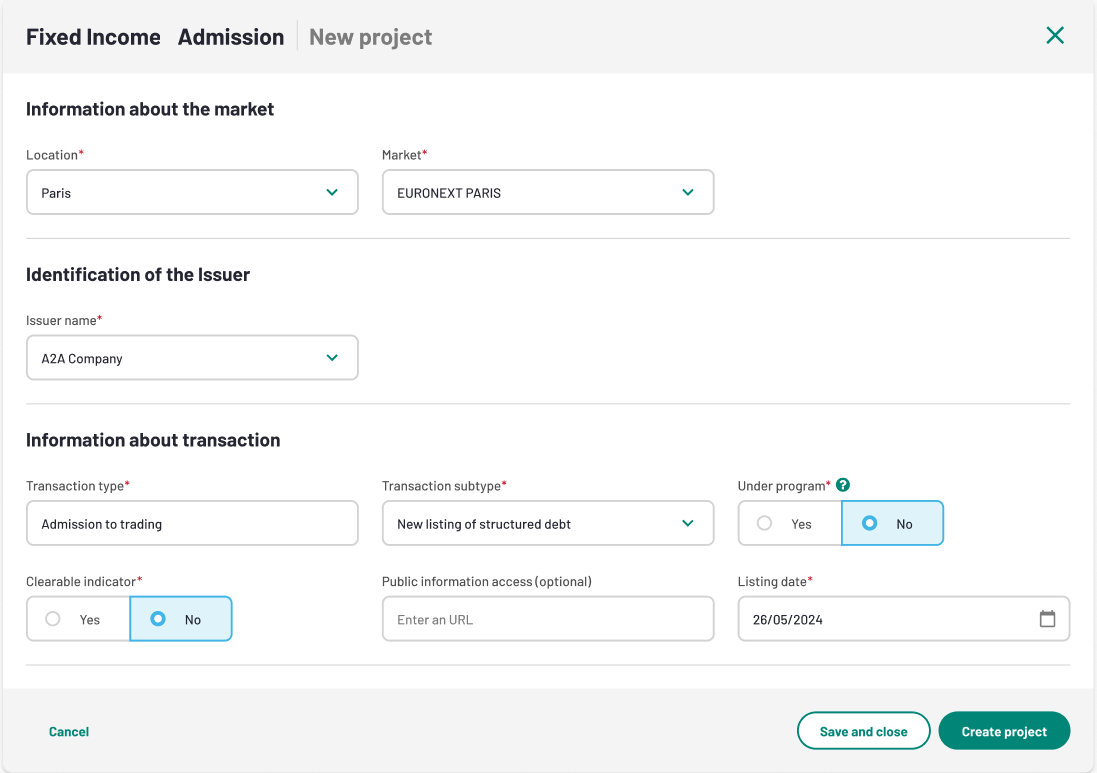
Fields marked with a red star are mandatory. The exact labels and available choices may vary according to the selected location, market, transaction type, and transaction subtype.
A project saved as a "Draft" does not generate a project folder and is not visible to Euronext. Your progress is preserved so you can return to it, but no listing process starts until you click "Create the project".
New transaction subtype: Increase of outstanding amount
When to use this subtype
Use "Increase of Outstanding Amount" when you need to list additional bonds under an ISIN already admitted to trading.
Differences from a standard new bond listing
Instrument Information form to complete - see the table below for the fields you need to complete.
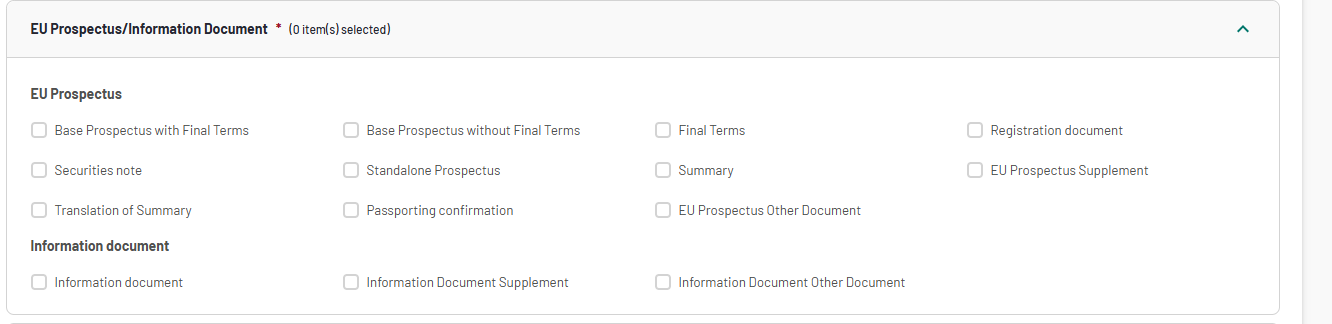
Issuer documents are configured identically to a standard "New Listing of Bonds" project — the same documents you are already familiar with. Is mandatory to submit at least one document available under the catergoy named EU Prospectus/Information Document
Project folder
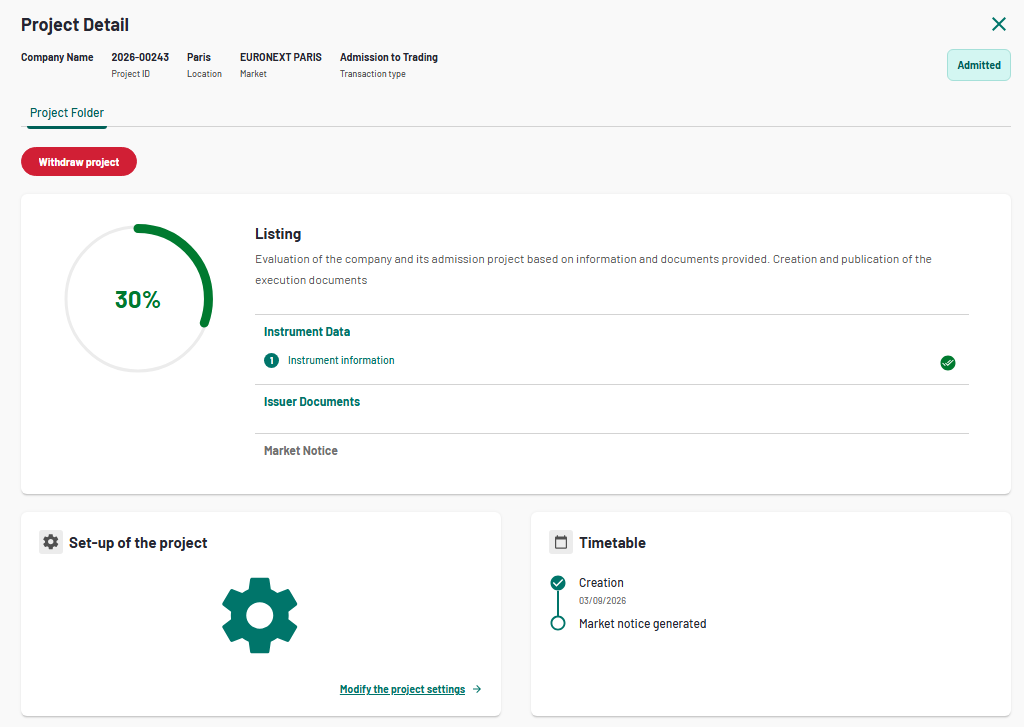
Once a project is created (status: "Ongoing"), a project folder is generated automatically. This is your central workspace for the entire listing — it brings together all tasks, their statuses, uploaded documents, and project information in one place.
The set of tasks displayed in the folder depends on the transaction subtype selected:
This is what a project folder looks like when it has just been created.
Withdrawing a project
You can withdraw a submitted project directly from the project folder, without contacting Euronext first. The option is available until the internal Euronext user clicks "Start of Trading".
Withdrawing a project cancels the listing process before it becomes active on the market. This is different from deleting a draft — a withdrawn project has already been submitted to Euronext and may have been partially processed.
Conditions for availability
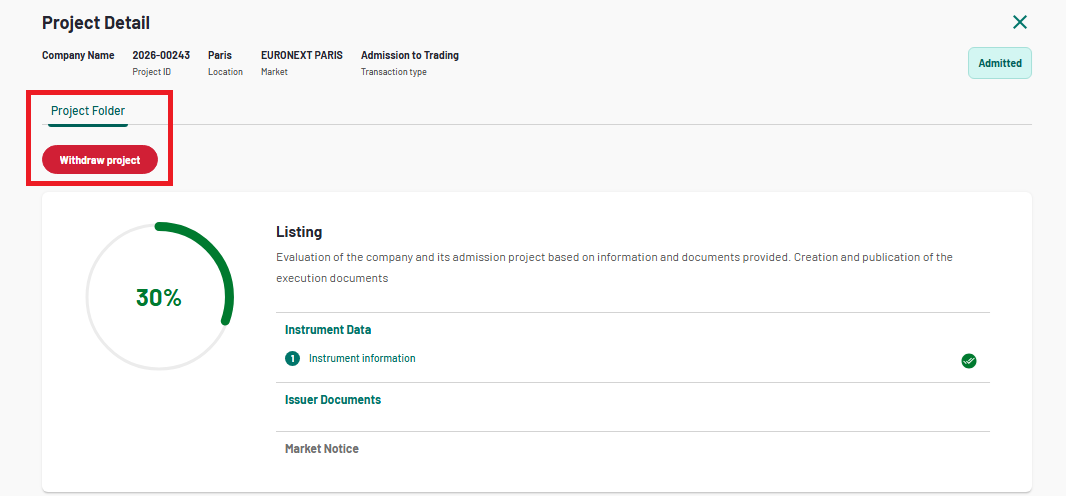
The "Withdraw Project" button is displayed in the project folder only when both conditions are satisfied:
- the project is not already Cancelled or Withdrawn
- Euronext has not yet triggered Start of Trading.
How to withdraw a submitted project
Locate the project in your Project List and click to open it. In the project folder, click the "Withdraw Project" action button. This button is visible for any submitted project that has not yet reached Start of Trading. Review the confirmation prompt carefully and click "Yes" to confirm. The project status changes to Withdrawn and Euronext is notified. To proceed with the listing you now need to create a new project.
After withdrawal or cancellation
Once a project is withdrawn or cancelled, all tasks become read-only. You can open and view the information previously entered in Instrument Information and Issuer Documents, but you cannot edit fields, upload documents, or remove documents. The project data remains visible in your view; it is not deleted. Documents can no longer be downloaded from the closed project.
Attention: Withdrawal is definitive and irreversible. Once confirmed, the project cannot be reactivated. After Start of Trading has been triggered by Euronext, the project can no longer be withdrawn through the platform. If you need to cancel a listing after this point, contact your Euronext representative — the process is different and may involve a separate request.
Listing phase
Once the project has been created, the Listing phase begins.
Instrument Data
The Instrument Data tab in your project folder shows the status of all instrument-related tasks during the Listing Phase. Instrument data can be entered by uploading a CSV file (recommended when listing multiple instruments) or by filling in the form directly on screen.
Download the CSV generator
In the project folder, click "Instrument Information".
Find the light-blue banner at the top of the page, which contains a "Download here" link.
Click "Download here" to save the CSV generator file to your computer.

Each action type now has its own dedicated CSV template. The file name reflects your project's market and transaction type — for example: "Listing of Bonds", "Listing of Structured Debt", or "Listing of Oslo Bonds", "Increase Outstanding Amount". Always download the template directly from your specific project to receive the correct columns for that action type.
If you downloaded a CSV template in the past, discard that file and download a fresh copy from the platform. Old templates may contain missing mandatory columns or columns no longer accepted by the system.
Unlock the macro before opening the file
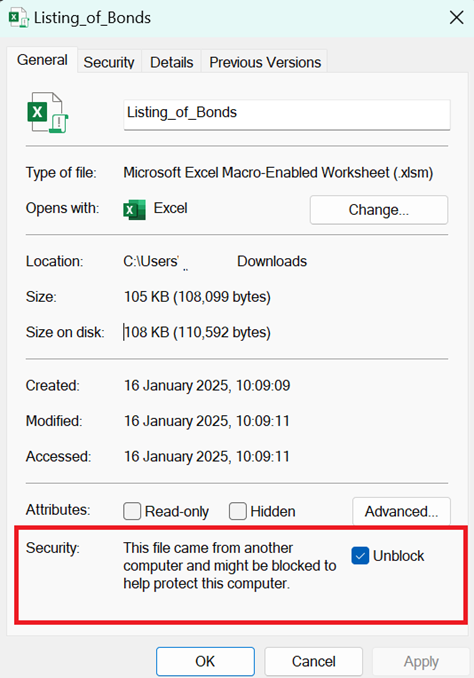
The CSV generator uses an embedded macro. On Windows, files downloaded from the internet are blocked by default and the macro will not run until you unlock the file: locate the downloaded file in your file explorer, but do not open it yet. Right-click the file and select "Properties".
In the "General" tab, tick the "Unblock" checkbox at the bottom of the window, then click "OK". You can now open the file with the macro enabled. If you open the file before completing the Unblock step, the macro will not run and you will not be able to generate the CSV. Always unblock the file first.
Fill in the file and generate the CSV
Open the unlocked file and fill in each field. Use the dropdown lists of valid values where available to ensure the correct input format.
Once all required fields are complete, click "Generate CSV". The generated CSV file is saved and ready for upload.

Fill in the file and generate the CSV
Open the unlocked file and fill in each field. Use the dropdown lists of valid values where available to ensure the correct input format.
Once all required fields are complete, click "Generate CSV". The generated CSV file is saved and ready for upload.
Upload the CSV to the platform
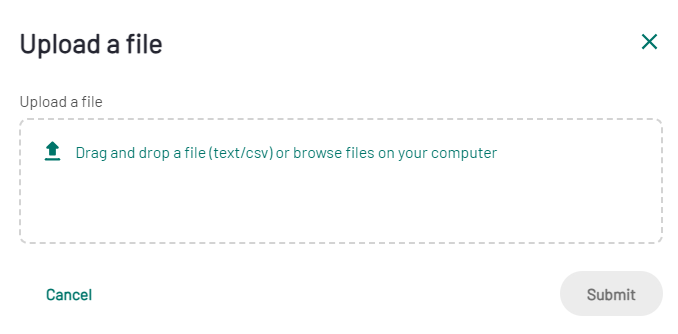
Return to the Instrument Information page in your project folder. Click "Upload new .csv".
In the upload box, either drag and drop the generated file or click to browse to it on your computer.
Review, correct, and submit
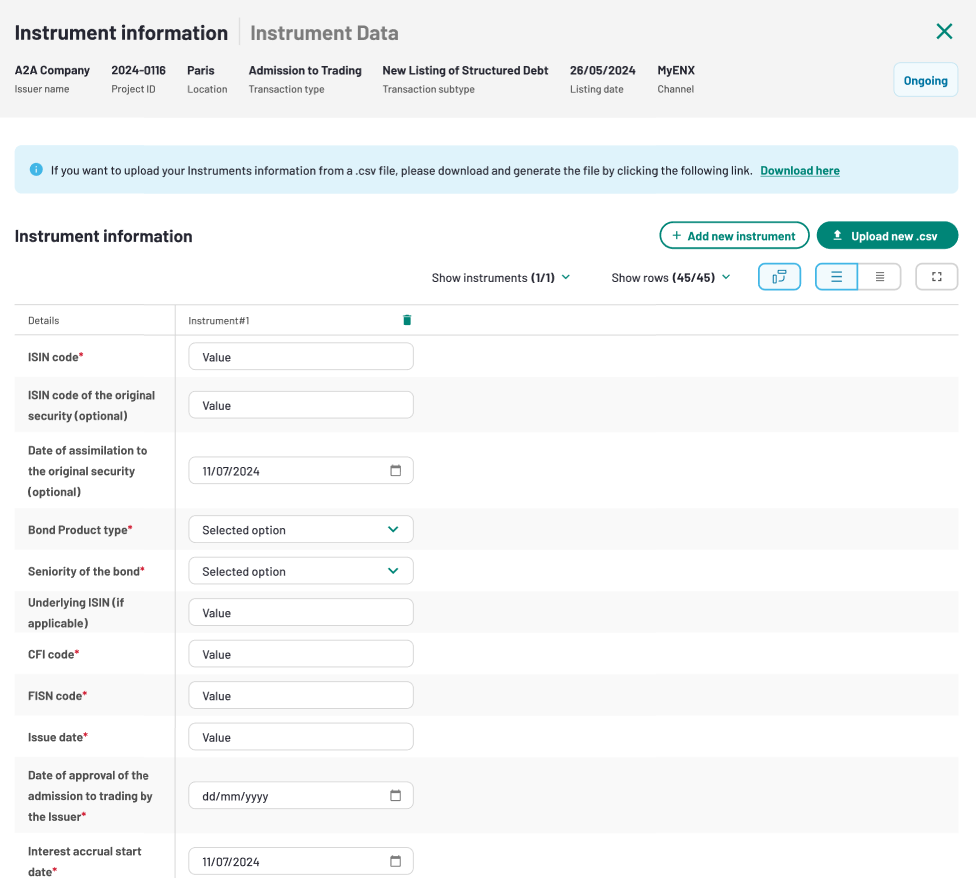
After upload, the data is automatically converted into an on-screen table for review. Check the imported data. Any fields containing errors are highlighted in red. Correct errors directly in the on-screen form. You do not need to re-upload the CSV for minor corrections. When all data is correct, click "Save and close" to save as a draft, or click "Submit" to send the form to Euronext for review.
After upload, the data is automatically converted into an on-screen table for review. Once uploaded, the data is automatically converted to a table (see example below).
Tip: Use "Save and close" if you need to gather missing information before finalising. Validation errors only appear when you click "Submit" — not when saving as a draft.
Fill in the Instrument Information manually
If you prefer to enter instrument data directly on screen without a CSV file:
Open the Instrument Information page from the project folder and fill in each field. The first instrument column is labelled "Instrument #1".
To add another instrument to the same project, click "Add new Instrument". A new column labelled "Instrument #2" appears; continue in the same way for each additional instrument. Click "Submit" when ready. If mandatory fields are missing or invalid, they are highlighted in red. Correct the highlighted fields and click "Submit" again.
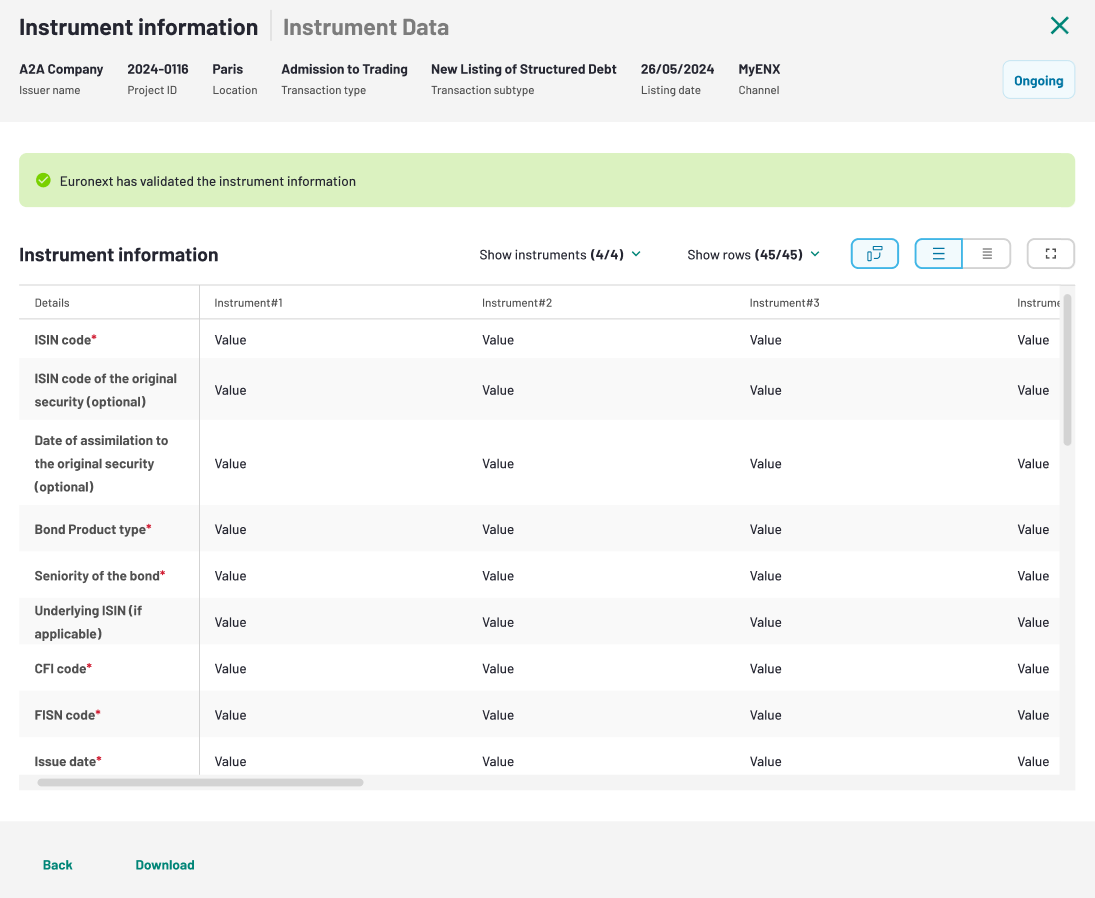
After submission, the form is sent to Euronext for review. An approval banner appears at the top of the page once Euronext validates your submission.
Instrument Information - mandatory fields and rules
When the .csv file is uploaded in the Instrument Information section, the application performs a series of consistency checks according to specific rules. See the table below for a list of all the mandatory fields across the selected locations. Mandatory fields are also highlighted by a red star in the form:
| Field | Description | Field Format | Mandatory for Oslo market | Mandatory for Amsterdam, Brussels, Lisbon, Paris markets |
|---|---|---|---|---|
ISIN code | ISIN Code (12 characters) | Y | Y | |
ISIN of the original security | ISIN code of the instrument to which the listed securities will be assimilated to after 40 days | ISIN Code (12 characters) | N | N |
Date of assimilation to the original security | Date on which the instrument will be (i) delisted from the Euronext market and (ii) assimilated to the original security | DD/MM/YYYY | N | N |
Bond Product type | Dropdown with possible values | Y | Y | |
Seniority of the bond | Dropdown with possible values | Y | Y | |
Underlying ISIN | ISIN code of the instrument's underlying (if any) | Max 4 ISINs (12 chars) with comma separator | N | N |
CFI Code | Max 6 characters Provided by the relevant numbering agency | CFI Code: 6 characters | Y | Y |
FISN Code | Max 35 characters Provided by the relevant numbering agency | FISN Code: alphanumeric, 35 characters | Y | Y |
Issue Date | Issuance date | DD/MM/YYYY | Y | Y |
Date of approval of the admission to trading by the Issuer | DD/MM/YYYY | Y | Y | |
Interest accrual start date | Beginning of the calculation of the accrued interest | DD/MM/YYYY | Y | Y |
Name other stock exchange/Euronext market | Text: 255 characters | N | N | |
Listing and trading in UNT/FMT | UNT= Quantity represents the number of securities to be bought or sold & price is expressed in trading currency FMT= Quantity is expressed as an amount of nominal value & price is expressed as % of the nominal value. | Dropdown with possible values | Y | Y |
Trading mode | Continuous trading: from market opening until closing of the market Single fixing: once per trading day Double fixing: twice per trading day | Dropdown with possible values | Y | Y |
Nominal value | Face value of the bond | Number: max 10 integers and 3 decimals | Y | Y |
Global nominal amount | Total issued amount | Number | Y | Y |
Multiple tradable amount | Must be a multiple of the Nominal value | Must be an integer value Should be a multiple (or submultiple) of the Nominal Value | N | N |
Issue price (percentage/currency) | Number: max 3 integers and 5 decimals | Y | Y | |
Redemption price (percentage/currency) | Price in % at which the bond instrument can be redeemed By default equal to 100% | Number: max 3 integers and 5 decimals | Y | Y |
Pool factor | Current pool factor of the bond instrument By default equal to 100% | > 0 (and not equal) minor or equal to 1 | Y | Y |
Trading currency | Denomination currency | Dropdown with possible values | Y | Y |
Maturity date | Legal maturity date of the instrument to be admitted to trading | DD/MM/YYYY | N | N |
Early redemption type | Dropdown with possible values | Y | Y | |
Redemption type | Dropdown with possible values | Y | Y | |
Coupon type | Multi coupon: Coupon nature changes over the instrument's lifetime Step coupon: Fixed payments increase/decrease following predefined schedule One coupon: Premium conditioned to underlying performance Reverse: Fixed coupon minus variable component | Dropdown with possible values | Y | Y |
Interest rate | To be set to "0" in the case of zero coupon instrument | Number: max 10 integers and 3 decimals | N | N |
Indexing parameter type | Identifies the redemption/remuneration structure of the bond instrument | Dropdown with possible values | Y | Y |
Indexing parameter | Dropdown with possible values | N | N | |
Spread | Percentage above/below the Indexing parameter | Number: max 10 integers and 3 decimals | N | N |
Fixing method parameter | Defines if the coupon is fixed before or after the interest accrual start date. If set to "Before", the bond instrument trades "clean". If set to "After", the bond instrument trades "dirty". | Dropdown with possible values | N | N |
Number of days until parameter fixing | If the coupon is fixed before the interest accrual start date, indicates the number of days until the calculation of the new coupon rate | Number: integer value between 0 and 2 | N | N |
Day count fraction | Dropdown with possible values | N | N | |
Business day convention | Defines when the coupon payment date is set when falling on a non-working day. Following : Next working day Modified Following : Preceding working day when next working day falls in the next month Preceding: Set to the preceding working day | Dropdown with possible values | N/A | N |
Flag adjusted | Indicates whether the interest needs to be adjusted considering the business day convention or not. No: No recalculation of the interest after adjustment Yes: Recalculation of the interest after adjustment | Dropdown with possible values | N/A | N |
Coupon Frequency | Dropdown with possible values | N | N | |
First payment date | The first coupon payment date AFTER the listing | DD/MM/YYYY | N | N |
Place of safekeeping | Indicates the Issuer Central Securities Depository (CSD) | Dropdown with possible values | Y | Y |
Securities paying agent name CSD account number | Dropdown with possible values | Y | Y | |
Is it the first issuance under this program (Y/N) | Dropdown with possible values | N | N | |
Prospectus / Programme code | The Prospectus / Programme must first be created & approved in MyEuronext, under the "Prospectus / Programme" tab in the Project List. The Prospectus / Programme code is displayed under the "Prospectus / Programme" tab in the Project List. | Text: 10 characters max | N | N |
ESG Bond sector | Dropdown with possible values | Y | Y | |
Issuance country code | Dropdown with possible values | N/A | Y | |
Issuance law country code | Dropdown with possible values | N/A | Y | |
Applicable country tax law | Indicates the fiscal law of the bond instrument By default equal to issuance country | Dropdown with possible values | N/A | Y |
Legal form of the security | Dropdown with possible values | Y | Y | |
Link to documentation | Must be a link | N | N | |
Other comments | For additional information such as visa number, signed Final Terms, change coupon type after a period, change of day count after a period, underlying name, etc... | Text: 500 characters | Y | Y |
Oslo-specific fields | ||||
Settlement platform | Dropdown with possible values | Y | Y | |
Amortization Type | Dropdown with possible values | Y | N/A | |
Full product name | Text: 40 characters | Y | N/A | |
Annual fee category | Dropdown with possible values | Y | N/A | |
Bond issue type | Dropdown with possible values | Y | N/A | |
Down payment method type | Dropdown with possible values | Y | N/A | |
First down payment date | DD/MM/YYYY | Y | N/A | |
Inspection fee - Admission documents | Dropdown with possible values | Y | N/A | |
Inspection fee - Loan description | Dropdown with possible values | Y | N/A | |
Registration fee | Dropdown with possible values | Y | N/A | |
Risk category | Dropdown with possible values | Y | N/A | |
Tap issue amount | Number | Y | N/A | |
Type of issuer | Dropdown with possible values | Y | N/A | |
Trustee company | Dropdown with possible values | Y | N/A | |
Date of request for admission to trading | DD/MM/YYYY | Y | N/A | |
First Coupon Date | DD/MM/YYYY | N | N/A | |
Second Coupon Date | DD/MM/YYYY | N | N/A | |
Other Trustee Company | Text | N | N/A | |
Billing contact fields (all markets) | ||||
Billing contact - Company name | Text | Y | Y | |
Billing Contact - First name | Text | Y | Y | |
Billing Contact - Last name | Text | Y | Y | |
Billing Contact - Job detail | Text | Y | Y | |
Billing Contact - Department | Text | Y | Y | |
Billing Contact - Postal address | Text | Y | Y | |
Billing Contact - VAT code | Text | Y | Y | |
Billing Contact - Email address | Text | Y | Y | |
Increase of outstanding amount's specific fields | ||||
ISIN Code | ISIN Code (12 characters) | Y | Y | |
Issue Date | Issuance date | DD/MM/YYYY | Y | |
Current number of bonds | Current number of bonds | No limit to the number of chars | Y | Y |
Number of bonds to list | Number of bonds to be listed | No limit to the number of chars | Y | Y |
New total number of bonds | New total number of bonds | No limit to the number of chars | Y | Y |
Current global nominal amount | Current global nominal amount | No limit to the number of chars | Y | Y |
New global nominal amount | New global nominal amount | No limit to the number of chars | Y | Y |
Issue price | Issue price | number between 0 and 999999999 | Y | Y |
Date of approval of the admission to trading by the Issuer* | Date of approval to admission to trading by the Issuer | DD/MM/YYYY | Y | Y |
Prospectus / Programme Code | Text: 10 characters max | N | N | |
Billing contact - Company name | Text | Y | Y | |
Billing Contact - First name | Text | Y | Y | |
Billing Contact - Last name | Text | Y | Y | |
Billing Contact - Job detail | Text | Y | Y | |
Billing Contact - Department | Text | Y | Y | |
Billing Contact - Postal address | Text | Y | Y | |
Billing Contact - VAT code | Text | Y | Y | |
Billing Contact - Email adress | Text | Y | Y | |
Issuer Documents
As a next step, when necessary, you will need to upload the required documents through the “Issuer Documents” interface.
Review the document categories, select the document types you need within each category, and click "Continue".
For each category marked with an asterisk (*), select and upload at least one document before submitting.
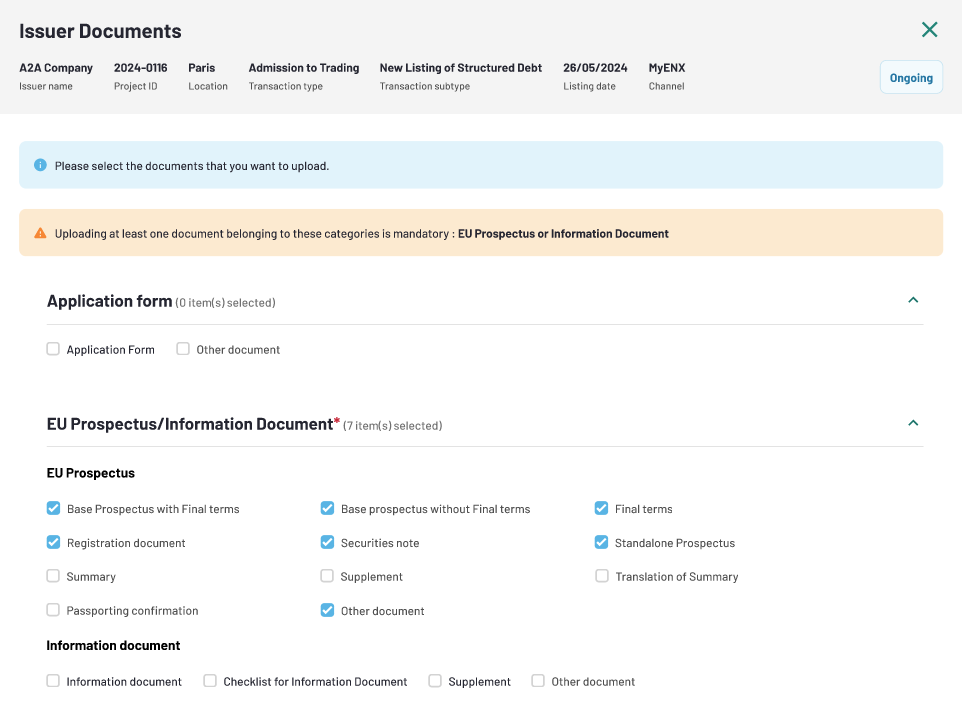
11. Issuer Document - Category selection
For each selected document type, click "Upload document".
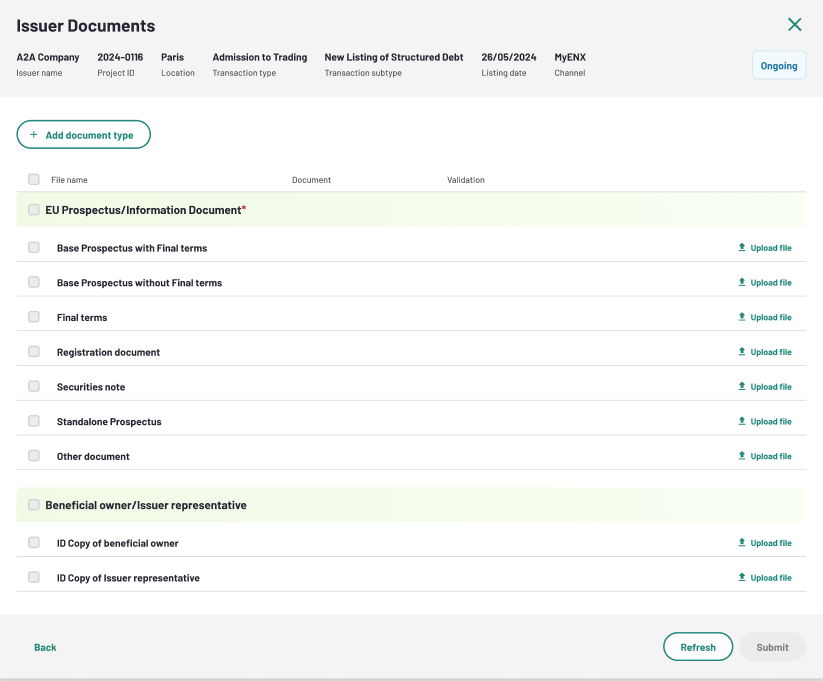
Enter a file name in the upload box, then either drag and drop the file or click to browse for it on your computer.
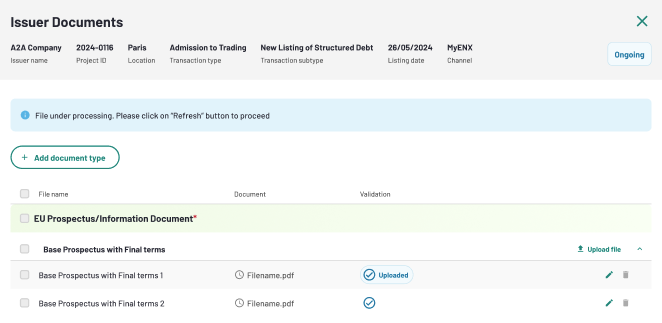
Wait for the automatic antivirus scan and click "Retry" to check the result. Every document must pass before submission.
Select the documents you want to submit using the checkboxes, then click "Submit".
Adding documents after the first submission
It is possible to add new documents, even after the first submission. Click on "Add document type" to define the new document category and select the document type.
The system will display all possible categories, but only the document types that have not been previously submitted will be available under a given category.
After you have uploaded the additional documents, click the "Retry" button. A banner shows that some documents are still waiting for Euronext validation. Select all the new documents and click the "Submit" button.
Admission phase
Once all Listing Phase tasks have been completed and validated by Euronext, the status of your project is automatically updated to "Executed".
- The Market Notice for the instrument is generated and made available in read-only format in your project folder.
- The instrument is now officially admitted to trading on the relevant Euronext market.
- No further action is required on your part unless Euronext contacts you.
When Euronext triggers Start of Trading, the system now correctly transmits the Start of Trading date as both the Listing Date and the Effective Date to the market infrastructure. This applies to all markets and transaction types.
What to verify once Start of Trading is confirmed
After Euronext confirms Start of Trading, open the Market Notice section of your project folder.
Check that the Listing Date and Effective Date on the generated notice match the Start of Trading date agreed with your Euronext representative.
If you notice any discrepancy, contact your Euronext representative immediately with the project ID.
Confirmation and Next Steps
For most projects, the workflow described in the previous sections, is all you need to follow. At the key checkpoints below, a brief verification is recommended before progressing:
For Zero Coupon or One Coupon instruments, verify that Pricing Type reads "Percentage Dirty". If it reads "Percentage Clean", do not submit and contact your Euronext representative.
After Start of Trading is confirmed, open the Market Notice and compare the Listing Date and Effective Date with the Start of Trading date in the project record.
Always download a fresh CSV template directly from your project.
If you encounter any unexpected behaviour, note the project ID, the screen you were on, and what you observed — then contact your Euronext representative with those details.
Frequently Made Mistakes
| Mistake | How to Avoid It |
|---|---|
Selecting "Increase of Outstanding Amount" when a full new listing is required | This subtype is only for adding bonds under an ISIN already admitted to trading. If in doubt, ask your Euronext representative before creating the project. |
Creating a project as a Draft and forgetting to finalise it | A Draft project is not visible to Euronext and no listing process starts until you return to it and click "Create the project". Check your Project List for incomplete Drafts regularly. |
Attempting to withdraw a project after Start of Trading has been triggered | Withdrawal is only available up to — and not including — the moment an internal Euronext user clicks "Start of Trading". After that point, contact your Euronext representative. |
Opening the CSV generator without first unblocking the macro | Right-click the downloaded file, select "Properties", tick "Unblock" in the General tab, and click OK before opening the file. If the macro does not run, close the file, unblock it, and reopen it. |
Using an outdated CSV template | Always download a fresh template directly from the project. Templates downloaded before July 2026 may have missing or incorrect columns for your action type. |
Assuming the Pricing Type needs to be set manually | The Pricing Type is read-only and calculated automatically. Review it in Extra Instrument Parameters before proceeding — if it appears incorrect, contact your Euronext representative rather than trying to edit it. |
Not verifying the Start of Trading dates on the Market Notice | After Euronext triggers Start of Trading, open the Market Notice and compare the Listing Date and Effective Date to the Start of Trading date recorded in the project. |
Entering a Prospectus / Programme code before it has been created and approved | Create and approve the Prospectus/Programme under the "Prospectus / Programme" tab in the Project List first, then copy the code into the Instrument Information form. |
Submitting Issuer Documents before the antivirus scan has completed | Click "Retry" after uploading each document to check the scan result. Only submit once all documents show a passed status. |